
You may come across blocks in a drawing where either the insertion point of the block doesn’t meet your needs. Hopefully this post will help you save some time editing your block and also there’s an added bonus, I will show you how to add extra insertion points to your block – Yes, you can have multiple…
In the picture below, the scenario is that I have multiple instances of a block that contains attributes and the insertion point for this block is located at an odd location.

Without exploding the block and then recreating it, I suggest using the “Block Editor”
You can use the BEDIT command ( or command alias BE )and select the block from the list. Or an easier way is to:
- Simply select an instance of the block that you would like to edit
- Right click
- Select “Block Editor”

As you can see, the “Block Editor” option is greyed out which means that I am unable to use the block editor. And as shown below, when I use the BEDIT command, the command line says that the “Block Editor is disabled.”

This okay, there is an AutoCAD system variable (setvar) that many CAD managers set that prevents users from editing blocks.
The AutoCAD system variable is BLOCKEDITLOCK (shown below) and has a very simple On & Off setting

As shown below, simply enter BLOCKEDITLOCK in the command line and set it to 0 (zero) to allow the block editor to be used.

- You can now select your block and right click and select “Block Editor.”
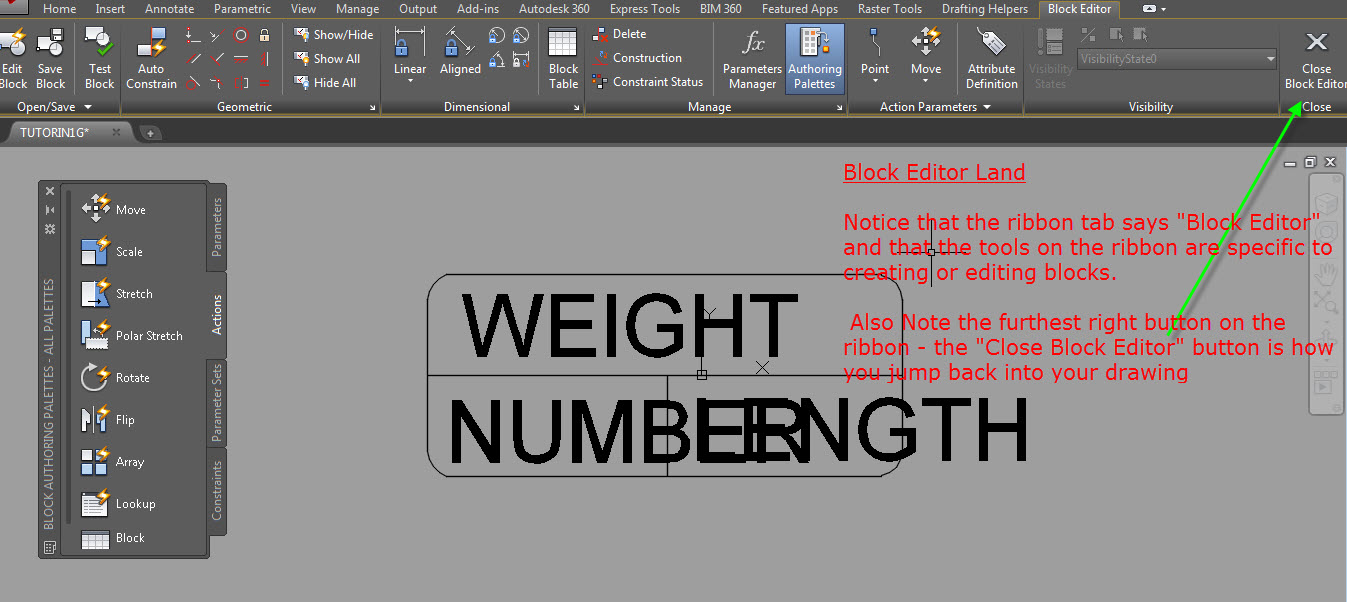
Your block will now open in the magical world of the block editor.
Notice that the background color is different (grey) which is good so that you remember that you are in the block editor and not in a drawing space (model or paper).
Also note that the current ribbon tab is a “contextual tab” called “Block Editor” and the tools in this tab are helpful for editing blocks and that there is a palette called the “Block Authoring Palette”
One important thing to notice is that when you want to exit the block editor, the furthest right button on the tab labeled “Close Block Editor” is what you want to use.
Selecting all of the objects in the block editor, I will now move them using the MOVE command to orient the desired “main” insertion point to 0,0 (shown below)

If moving the insertion point is all that you need done to a block, you can now use the “Close Block Editor” button and click “Save changes…” so that the block will reflect the moved insertion point.
To add another (or multiple) insertion point(s) to the block:
- Click on the “Parameters” tab of the palette
- Click “Point” from the palette
- Click to place the new point
- Move the cursor away from the point you just picked, and place the “Parameter”
(Note: usually when you place something from the “Parameters” tab, you need to also apply an action to that “parameter.” This is usually how you make a dynamic block. but placing these extra points alone, requires no other “actions” to be applied to make it “dynamic” for our purpose)

- Click “Close Block Editor“
- Click “Save the changes to (your block name)“
 Because our block has attributes, you might notice that the attributes didn’t move. This is because when the block was created, the “Lock Position” option was set to “Yes” when the Attribute was created.

To fix this, Use the ATTSYNC command which can be found on the “Insert” tab of the ribbon > “Block Definition” panel drop down > Click on “Synchronize”
- Select the block that needs to be “synced”
- Verify that you would like to sync the block by selecting Yes
Now that the block is ready for use, you can make use of those extra insertion points by using the INSERT command (or command alias I )
- Select the name of the block from the list to insert
- Prior to placing the block, use the CTRL key to toggle through the various insertion points.


wow… Esto es novedoso…. gracias por enseñarnos unos pasos mas en el camino Autocad
thank you so much Sir Greg. :) more power!
If you want to temporarily change the insertion point of a block, type ‘Insert‘ at the command line and choose your block then when asked for insertion point type B for Basepoint . After that, all you have to do is to choose the new base point and insert the block.
Thanks for the tutorial! It’s been really helpful and much simple than others (I’ve been looking for this for a while). This page goes straight to the Bookmarks ;)