Trim

The trim function in AutoCAD is very useful but it is commonly not understood or used correctly. Here are some helpful tips on using TRIM.

<command> TRIM or TR <enter> on the RIBBON – Home tab/ribbon > Modify panel > Trim button

If you do the above command or push the button, you have two options 1) “Select objects” or 2) hit enter one more time to “<select all>.”
1) SELECT OBJECTS

  • Think of this as selecting the edge that you want to trim to or trim between.
  • Pick the line or lines that will be the cutting edges and hit <enter>.
  • Now select the line or lines that cross the cutting edge and hit <enter>
  • Note – the side of the edge you select will be trimmed.

In the picture below, #s 1 & 2 are the cutting edges and #3 is the object that I want to trim.

2) <SELECT ALL>
This is also known as “TRIM <enter> <enter>”
What this does is instead of individually selecting your cutting edges, everything in the drawing is selected as a cutting edge.
In the above picture, if the TRIM <enter> <enter> function was to be used to create the same results , you would have to select each portion of the circle between the lines.
There area times when TRIM <enter> <enter> is useful, but knowing when to use both functions will save you time.

Drafters use the trim function so much that they have added an EXTEND function into TRIM. To do this:
TRIM <enter> <enter> then hold down the SHIFT button, then pick the side of any line(s) and the line will extend itself to the nearest object that is in the line’s path. To make the line go further, just keep clicking on it until it extends to the desired object.

TRIM with a “Fence”
This trim function may sound confusing, but it is really just drawing a polyline through other lines and objects, and the segment where the “fence” (polyline) crosses, it trims.
See the picture below. the greens line is the “fence” and it passes through the overhanging lines and trims them.


BONUS!!!    EXTRIM
The command EXTRIM is not found in the ribbon. It is just one of those secret commands that people wish they knew yesterday.
It is great for trimming little lines that  are too small to see or large amounts of overhanging lines.
To use EXTRIM:

  • <command> EXTRIM <enter>
  • Select the boundary edge
  • Pick the side of the boundary that you want to be trimmed. Everything on the side that choose that crosses the boundary will be trimmed.

See Picture Below:  The yellow line is a ployline that has been selected as the boundary and the outside of the boundary was chosen for the “side” to be trimmed.


Posted in BASICS | 11 Comments

Attributes – Creating & Extracting

An ATTRIBUTE is information that is attached to a block. This information is extractable (can be taken out of the block) and is useful for compiling such things as a Bill of Materials or area totals…

Creating Attributes
command: ATTDEF  or ATT
on the ribbon: Insert tab/ribbon > Attributes panel  >

Attributes are comprised of 3 elements: 1)TAG, 2)PROMPT, 3)DEFAULT.

TAG – Name of the attribute, usually a description. Ex. “COST” or “SIZE”
* No spaces allowed or characters.

PROMPT – Usually a question that asks the user for inupt.
Ex. “What is the size?”

DEFAULT – Either enter the known value so that the user does not need to fill this out OR enter the desired format so that there is consistency in the user’s response. Ex. “0’-0”

* Check the Align checkbox when placing ATTs after the first Att is placed.
REMINDER  –      The Picture below shows that there are 3 ATTs. that are attached to the block. And each ATT. consists of the 3 main elements. This will keep your ATTs lined up nicely.

 MODE

  • Invisible – when checked, the ATT is hidden
  • Constant – check this if the Default is already set and needs to stay the same.
  • Verify – Asks the same question (prompt) twice. This is good for double-checking but also annoying.
  • Preset – When checked, will not prompt the user for info
  • Lock Position – unchecked, will allow the ATT to move independently of the block.
    Strongly not suggested.
  • Multiple Lines – Like MTEXT but for Attributes

 ATTDIA  <1> turns on the ATT dialog box
                     <0>  turns off the ATT dialog box

ATTDISP         <NORMAL> default
                              <ON> Visible
                              <OFF> Hides all ATTs in the drawing

When making a block of the ATTs and objects, DO NOT use a window to select everything. This will reverse the order that the ATTs will prompt. Instead, select each ATT individually in the desired order, then use a window to select the objects.

 EDIT ATTRIBUTES

 BATTMAN           Edits the main three (TAG, PROMPT & DEFAULT) and allows changes to be made to the order of prompts.

ATTEDIT               Edits the “DEFAULT” prompt

GATTE       Global Attribute Editor – can either select an ATT or enter the name of the ATT or block.

 Single instance edit———EATTEDIT 
                                                  *Also activates when double-clicking the block or ATT

 Single instance edit——— DDATTE

ATTREQ    <0> Turns off prompts when inserting a block with ATTs – good for quick
placement
<1> Turns on prompts

Select a particular ATT by holding CTRL then double-clicking the ATT

ATTSYNC Synchronize ATTs from outside of BATTMAN

ATTOUT    Quick data extraction of selected blocks to a text (.txt) file

DATA EXTRACTION

Now that you spent all of that time creating data and attaching it to a block, you can now extract this data and create a total of items for costs or a bill of materials…

To extract data:
command: DATAEXTRACTION  or DX
on the ribbon: Insert tab/ribbon > Linking & Extracting panel > (button)


Data Extraction allows you to do a number of things with the data that you pull out of the drawing. The most common uses are 1) creating a table that is placed within the drawing.
2) creating an excel spreadsheet with the extracted data.

 When you start Data Extraction: (follow the 8 steps)

1)      Check the “Create New data extraction” for a new extraction. The option below it (Use previous…) is for when you have already weeded through what information you want to extract, and placed a table…. You can use those settings for this data extraction.
– Name the data extraction – this will create a .dxe file (normal)  ex. “Lights”

2)      DEFINE DATA SOURCE – Select what drawings to extract data from OR Select individual objects from a single drawing.

3)      SELECT OBJECTS – Check or uncheck objects to extract their data. Since we created ATTs, lets uncheck everything in the “Object” column except for the “Attribute Definition.” * An easy way to uncheck all is to right click and select “uncheck all” then check the items that you do want checked.
In the lower “Display Options” portion – uncheck the “Display all objects” box and then make sure that “Display blocks only” is selected. This way we don’t see every item in the drawing. We can now select the blocks in the drawing.

4)      SELECT PROPERTIES – on the right side portion (category filter), right click and select “uncheck all” and then check the “Attribute” filter. Now in the left (main) box (properties), you can weed out what Attributes you do want or don’t want to extract.

5)      REFINE DATA – This is a preview of how the data will be sorted. You can drag the columns to the order that you want it display.
Advanced – If you have a spread sheet that you want this data extraction info to go into, select the “link external data” button and find the file that you want to link this data to.

6)      CHOOSE OUTPUT – 1st checkbox = placing a table of the extracted data into the drawing.
2nd checkbox = creating a NEW Text (.txt) file or Excel (.xls) file from the extracted data.
Both boxes can be checked at the same time. For the 2nd checkbox, give the new file a name, file format (.txt or .xls) and specify a folder where the new file will be placed.

7)      TABLE STYLE – If you already have a table style setup, you can select this as a template for the new table that you are creating. Otherwise, enter a name for the Title of your table.

8)      FINISH – simply click finish to place the table in the drawing and/or create the new file. At this point you can also hit the BACK button to make any changes before placing the table.

After placing the table within the drawing, if you insert more blocks or delete blocks that are listed in the table, simply select the table, then right click and select “Update table data links” and the table in the drawing will be updated with the new total.

After you have placed a block, there are times that you may need to EXPLODE the block. If the attributes to your block are visible, what you see is the “default” value or the value that the user has provided. But when you explode a block with attributes, you no longer see the default value. What happens is that the attribute reverts back to its “tag” information. But don’t worry. Use the command BURST  instead of EXPLODE and what is now visible is the “default” value – the useful info…


In the picture above, these are copies of the same block. They have both been exploded. The block on the left has been exploded using EXPLODE or X and the block on the right has been exploded using BURST  and has kept its values visible.

Posted in Attributes, BASICS | 3 Comments

MVSETUP New Drawing from scratch

In an open session of AutoCAD, Open the Application Menu (the Application Menu is the big-red-A in the upper-left).

In the Application Menu:
Click NEW→Drawing
                a dialog box will open (these are available templates {.dwt} to choose from)
                Choose the acad.dwt — This should be the default

  • Save and name your new drawing.

MVSETUP = MultiView Setup
                MVSETUP offers two different setup options depending on whether  you are in Model Space or in a Layout (Paper Space).

  • In Model Space – you set the units type, drawing scale factor, and paper size at the Command prompt using MVSETUP. Using the settings you provide, a rectangular border is drawn at the grid limits.
  • In Paper Space – you can insert one of several predefined title blocks into the drawing and create a set of layout viewports within the title block. You can specify a global scale as the ratio between the scale of the title block in the layout and the drawing on the Model tab. The Model tab is most useful for plotting multiple views of a drawing within a single border.

For ACC students, use MVSETUP in Model Space
                MVSETUP
                No           (to not create a new layout tab – we will do this in another lesson)
                A             (Architectural units)
                48           (Scale factor – common arch. scale factor is ¼” = 1’-0”
                24           Width – see table below for paper size.  (ex. 24 X 18 = C Size)
                                Since we are printing in “landscape” mode, we enter the bigger number of the paper size first
                18           Length – Smaller number from the list below


Once MVSETUP is finished, it will show a rectangle. This is the area where your grid will show up if you have the grid on. This box is pretty much useless so just erase it. You will not need it.
From here, set up dimension styles, text styles, layer…
If these settings will used in other drawings here are two suggestions, the first of which is recommended because it is less error prone.
1) After creating the desired settings, do a save-as and save it as a .dwt. All of the settings that you created will be saved.
2) After using this drawing, open it and erase all objects. The settings will remain but you will have to hunt down the objects        that need to be erased in layouts and xrefs ….

Posted in BASICS, Settling In, Uncategorized | 1 Comment

Mirrored Text

Have you ever received a drawing or made a drawing that the text was mirrored, thus unreadable? This mainly happens when a block with either text or attributes is mirrored and the system variable “MIRRTEXT” has been set to <1>.

As I have shown in previous posts, changing a system variable is easy by either using the SYSVDLG dialog box or simply typing the name of the system variable – MIRRTEXT and changing it to <0>.

 Mirrored Text and their settings

 Mirrored Text with blocks. The middle block has been mirrored on both sides to shows the different settings.


Posted in BASICS, Customization | 1 Comment

Track Path

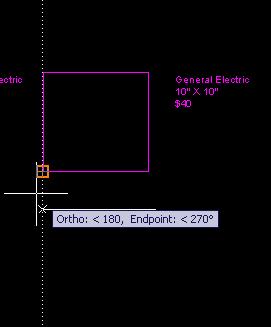
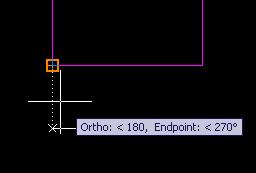
If you use “Object Snap Tracking” or OTRACK, you will like this tip. If you have ever been annoyed with the dashed “track path” that goes infinitely across your screen, you can change this so that the dashed line only appears from the track point to the cursor. You do this by either going to the System Variable Editor (SYSVDLG)  and looking for the TRACKPATH variable or by typing in TRACKPATH at the command line and changing the value to <1>.
Here is a description of the TRACKPATH Variable:
Controls the display of polar and object snap tracking alignment paths.
Available Variables:
<0>  Displays full-screen polar and object snap tracking paths
<1>  Displays full-screen polar tracking path; displays object snap tracking path only between the alignment point and the From point to the cursor location
<2>  Displays full-screen object snap tracking path; does not display polar tracking path
<3>  Does not display polar tracking path; displays object snap tracking path only between the alignment point and the From point to the cursor location


TRACKPATH <0>


TRACKPATH <1>

Posted in Customization, Settling In, Uncategorized | Leave a comment

Command Alias & Select Similar

There are commands in AutoCAD that do not have a shortened alias for easy use. An Alias is a one-to-three letter shortened version of a command that saves time typing in the command. For example, the alias L is the same as the command LINE .

Luckily, for those who have a full version of AutoCAD and have the Express Tools loaded have a command alias generator/editor. To find it in the ribbon:
Express Tools tab/ribbon > Tools panel > Command Alias button
command = ALIASEDIT

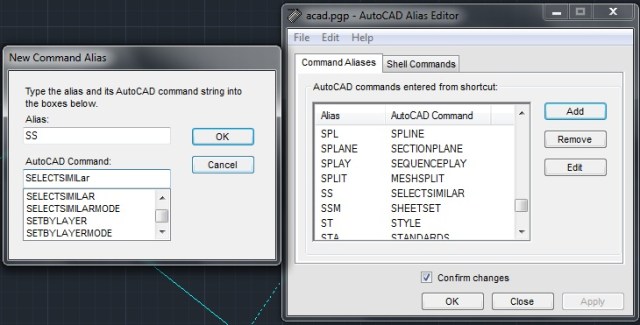
This editor is great because it is fast and prevents you from messing up your acad.pgp file. For those who do not know what the acad.pgp file is. It is the AutoCAD Program Perameters file where command and command aliases are stored. For those who know what they are doing, you can find and edit this file as needed. But if you edit this file while AutoCAD is running, you either have to restart AutoCAD or use the REINIT command for AutoCAD to take on the new changes. Well, with this handy-dandy Alias Editor, it does all of that work for you and makes sure that you don’t duplicate an alias that is in use. It’s also a great way to get familiar with what commands have what alias….

In the Alias Editor dialog box:

Click the ADD button – a new dialog will appear
Enter the new alias in the upper text box – for this example (2011) enter SS
Enter the Command that will be tied to the new alias in the lower text box. – for this example (2011) enter SELECTSIMILAR.
click OK and confirm the change.
Congratulations on making your alias.

In AutoCAD 2011, there is a great new command (among many) called SELECTSIMILAR.
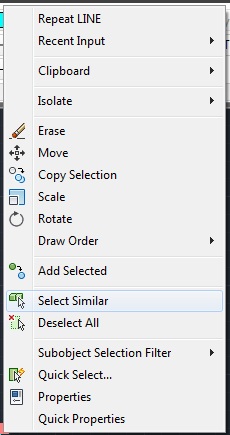
There are a couple of ways to use this command. If you select an object – let’s say a line in the drawing and then right-click, you will see this new option in the right-click menu. If you select it, it will select all of the lines that are on that layer that are in the drawing. If you select a line on one layer and another line on a different layer and even a circle that is on another layer, then right-click, you will notice that SELECT SIMILAR is still there. If you select it now, it will select all of the lines on those two layers and all circles on the third layer in the drawing.


This is an easy way to filter your selection. But wait – there’s more…
We created a new alias – now let’s use it.
Enter the new alias SS <enter> at the command line and look at what you see in the command line. It says “Select objects or [SEttings]:”
Type in SE <enter> at the command line and a little dialog will appear that allows you to select even more settings of objects besides the layer.
If you like the Quick Select command, you’ll really appreciate this one as well

Posted in BASICS, Customization, New in 2011 | 5 Comments

SYSTEM VARIABLES DIALOG BOX

If you have ever changeda System Variable in AutoCAD, I bet that you have wanted to know what options were available. Well, There is tool found at:
Express Tools Tab > Tools panel > System Variables
Or the command = SYSVDLG <enter>

System Variable Dialog
This dialog box shows the system variables that you can change and gives a description of the system variable. And most importantly, it shows the available options for the variable and describes each option.
Enjoy…


Posted in BASICS, Customization | 3 Comments

OOPS!!!

After you have erased/deleted an object and have kept on working, but then realized that you need that deleted object back, you don’t need to undo or CTRL-Z repeatedly to get back that long-lost object. Simply type in OOPS at the command line. THIS WILL BRING BACK THE LAST DELETED OBJECT. This command cannot be used repeatedly.

Posted in BASICS | Leave a comment

SNAP OVERRIDES (temporary osnaps)

While in the middle of a command, you can temporarily turn on a needed OSNAP  a number of ways. The most obvious way is to right-click the OSNAP button and then choose the wanted OSNAP. The problem that is most common with this method is that this method keeps that OSNAP on. So after a while, you may have too many OSNAPs on and have to turn some off.

One method is to RIGHT-CLICK while in the middle of a command and select “Snap Overrides” then choose the needed OSNAP.


The other method is to enter the three-letter shortcut to envoke the temporary OSNAP
Listed below is a list of these shortcuts.

APP – Apparent Intersection
CEN – Center
END or ENDP – Endpoint
EXT – Extension
FRO – From
INS – Insert
INT – Intersection
M2P – Mid Between 2 Points
MID – Midpoint
NEA – Nearest
NOD – Node
NON – None (temporarily turns off all osnaps) same as hitting F3
PAR – Parallel
PER – Perpendicular
QUA – Quadrant
TAN – Tangent

Posted in BASICS | 14 Comments

LOST IN THE RIBBON? – FORGOTTEN COMMAND?

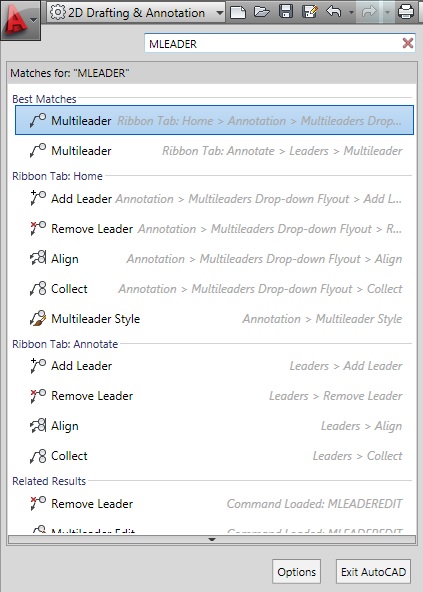
If you have made the switch to the ribbon (highly recommended) or you don’t know where to find a command or function in the ribbon, open the Application Menu (the big red A in the upper left). By default, there is a text box at the top of the Application Menu that is flashing (waiting for text to be entered). Type in the name of the known command BUT DON’T HIT ENTER (or the command will start).
Under the text box, options will be shown concerning that command including where to find that command on the ribbon.


Forgot a command?
If all that you can remember of a command is the first letter or two, enter the known letters in the command line then hit TAB repeatedly until you see the command that you want and hit <enter>.
If you pass the command, hold down SHIFT, then hit TAB to go backwards.

Posted in BASICS | Leave a comment