Area & Subtracting Areas

Not every room that you draw is going to be free from obstructions like columns or partial walls. If you have ever used the AREA command, you know how cool of a tool it is. It will tell you the area of an object in square units and will also tell you the perimeter of that area.

I ran into an instance today where I needed to find the area of a room but the room had columns/pillars in the room. Thank goodness AutoCAD thought of that common problem or I might have had to do some math on my own.

Here’s how:

(Note – I made a closed polyline of the perimeter of the room and also closed polylines for the columns prior to running the AREA command so that I can easily select an object instead of tracing the corners of the room.)

  • AREA <enter>

OR – On the ribbon:

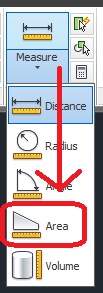
Home tab > Utilities panel > MEASUREGEOM drop-down list > AREA button.


Now that the AREA command is active look at the command line. You have options, and one of these options is “Add area.”

  • A <enter> for the “Add area” option.
  • O <enter> to select the polyline that outlines the room.
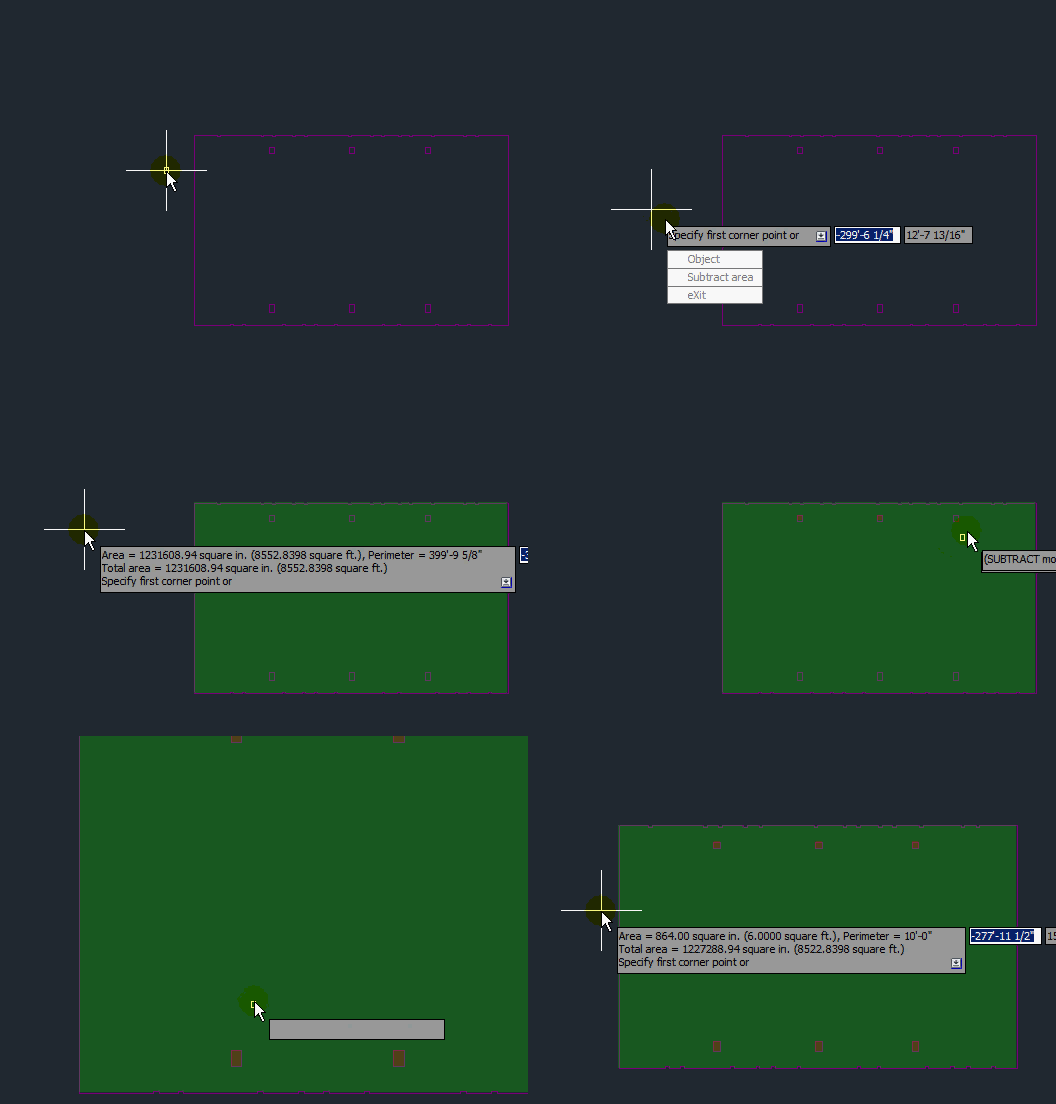
  • Select the outline of the room. Notice that the are turns GREEN. This means that you are “adding” areas. You can continue to add areas like a running total of all of the areas.
  • <enter> to accept this as our main area.
  • S <enter> to “Subtract area”
  • O <enter> to select the polylines that outline the columns in the middle of the room.
  • Select the polylines of the room. Notice that while in the “Subtract area” mode, that the objects that you select turn RED. This lets you know that you are in fact subtracting areas from the running total.
  • <enter> to end the subtract mode
  • <enter> once more to end the command and to see the total area minus the columns in the command line


Posted in BASICS, Dimensions, TIPS | 6 Comments

Curved Multi Leaders (MLEADERS)

There are times when I use a curved MLeader because the straight lines of a normal MLeader might be confused with the straight lines of the object that I am drawing. After all, as a drafter, my job is clarity and accuracy, and the last thing that I want in my drawings is something that is not clear.

Here’s how to add the curved leader to an MLeader:

1) You can set up a MLeader style and click on the “Leader Format” tab and click on the “Type” drop-down list and select “Spline” from the list. (as seen below)


2) The other way  to do this allows you to change the leader shape to individual MLeaders. (as seen below)

  • Select the leader that you want to make curved.
  • Right-Click and select “Properties” from the right-click menu. This will open the Properties Palette.
  • In the “Leaders” section of the Properties Palette, the first property that you can change is called “Leader Type” and the list should look like the one above where the list says “Straight.”
  • Click on this Drop-down list and select “Spline”

Posted in BASICS, Dimensions, Leaders, Text, TIPS | Leave a comment

Move with OTRACK

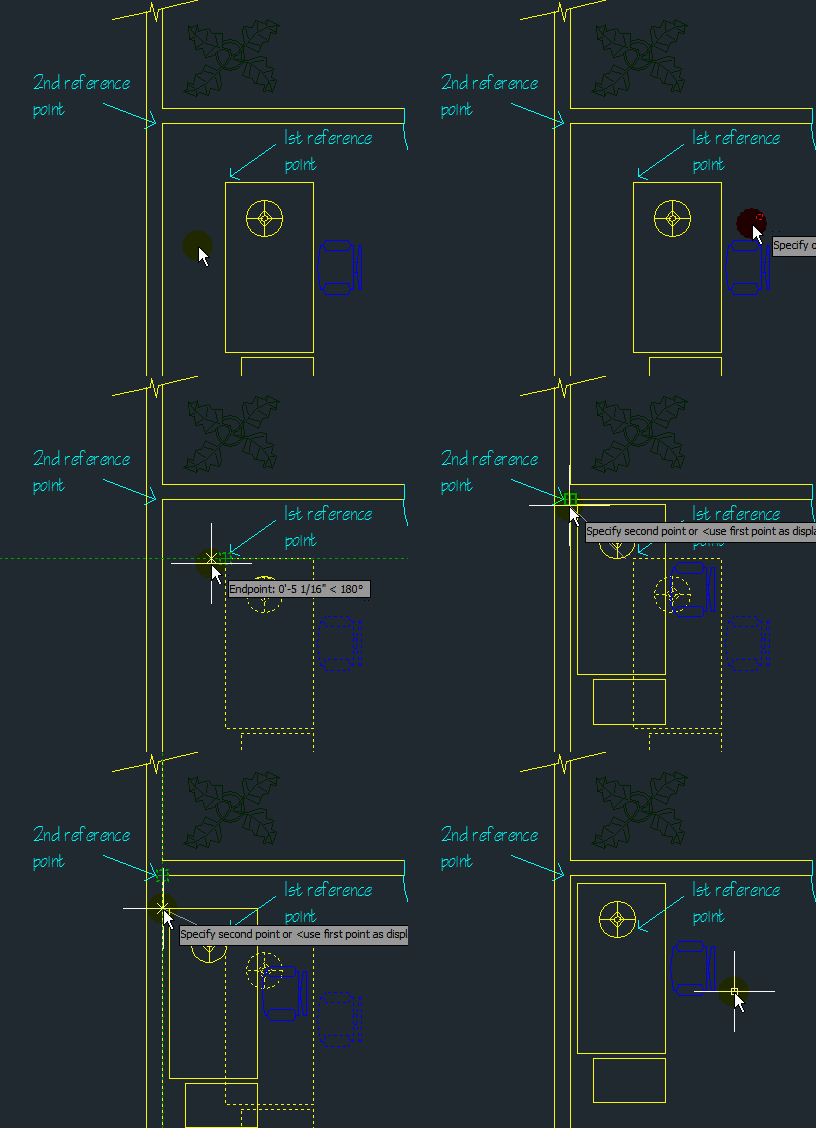
Here are two examples of using the MOVE command with Object Tracking.

Move with one reference point:

  • Start the MOVE command and select the object(s) to move
  • When asked to specify a base point, I tracked off of  the midpoint  OSNAP and pulled the cursor in the direction I wanted to go and entered 2 in the command line.
  • With the basepoint now 2 inches away from the mid point, I selected the midpoint of the desk to place the chair.


Move with 2 reference points:

  • Start the MOVE command and select the object(s)
  • When asked to specify base point, I tracked away from one corner of the desk and entered 3 in the command line. [This is tracking off of the origin point]
  • Then I am asked to specify the second point. I then track away from the destination point 3 inches. [This is tracking off of the destination point]
  • The objects are now positioned 3 inches below and to the right of the corner of the room without creating any reference lines.


(IMPORTANT NOTE – to use OTRACK for 2 points you cannot track off of the same point for the 2 points. remember to track off of the ORIGIN point and then the DESTINATION point)

Posted in BASICS, Modifying, TIPS | Leave a comment

Object Tracking OTRACK

here is a great tip that I am surprised at how many people don’t make use of. I think that the reason is that one very simple element that can either make this work or not work.

To make OTRACK work:

Hover over the reference point (osnap) until the Otrack box (aka “glyph”) appears. This may take a second or two so be patient. By hovering over the OSNAP point once more, you can also turn off the OTRACK glyph and choose another OTRACK point.

One of its best uses is to start a line a given distance away from an OSNAP without making a temporary guide line that you may forget to erase later on. Properly used, OTRACK can eliminate the need for construction lines (XLINE) and rays (RAY). It may take some practice and patience but Object Tracking is a great tool.

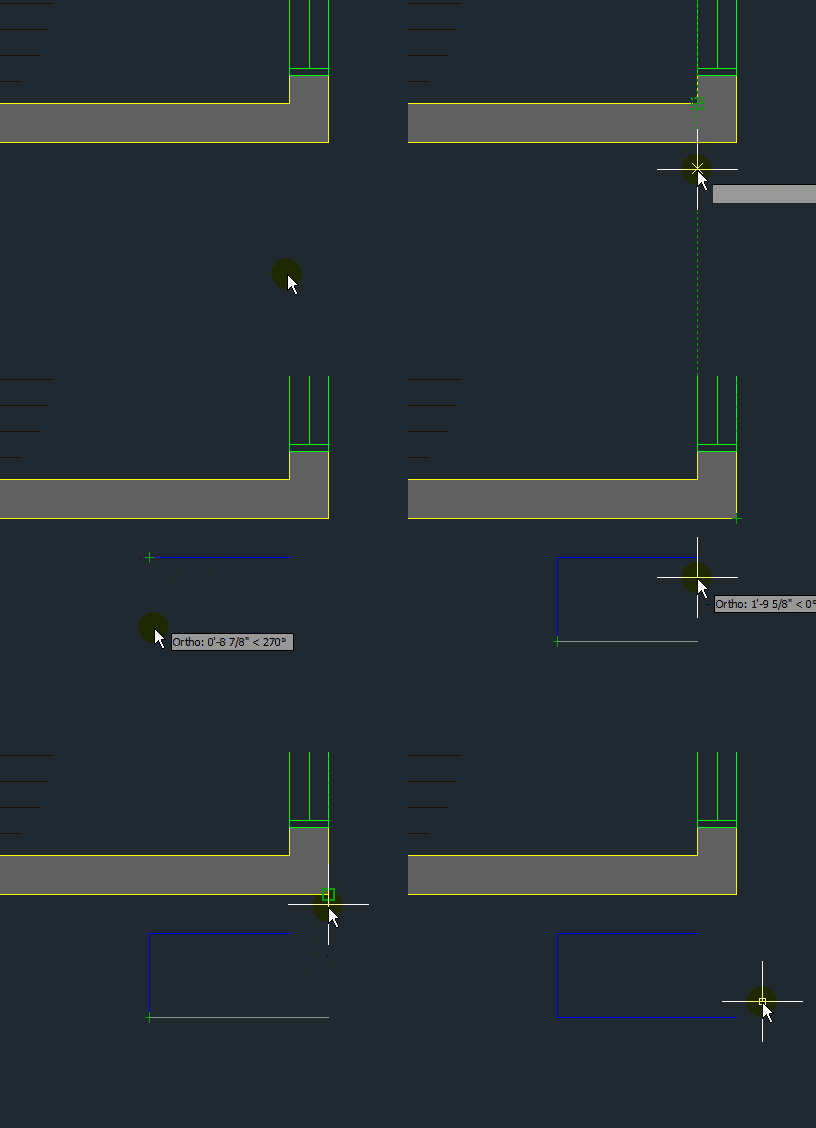
In the animated picture below:

  • I started the line command
  • Hovered over the endpoint osnap to activate OTRACK
  • entered 12 in the command line thus starting the line 12 inches away from the tracking point
  • I then pulled the line over and down a random distance and then came back below where I started the line.
  • I then played around with activating & deactivating OTRACK points by hovering over the various OSNAPs
  • Then I finally clicked when the desired OTRACK point intersected with my line and ended the line command.

Posted in BASICS, TIPS | Leave a comment

New AUTO-APPEND in 2012

Here is something that I found cool but annoying with AutoCAD 2012. Here’s the situation, if you forgot the name of a command, the old way (which still works) of finding this command is to enter the first letter or first couple of letters. Then hit the tab button and all the commands (and even system variables) show up in the command line. Try it, it’s cool. Now in AutoCAD 2012, as you type the first couple of letters of a command, it will automatically generate a list of  what you used to have to hit tab to see. This is pretty cool because you can see all these commands that maybe you forgot that even existed. Or even better, it shows you the aliases to these command. I found a couple aliases that I forgot existed.

The annoying thing is that they also enabled the “Auto-Append” function which means that after you enter your third character, it tries to guess what command you are trying to use. I tried to do a command yesterday at least three times and it wouldn’t work. This is partly because I have to look at the keyboard when I type. So before you get frustrated like I did, here’s how to disable the “Auto-Append” function:

  • Start typing any command.
  • As the list of command populates, right-click on any command within the list.
  • Uncheck the “Auto-Append” function from the list.

In the picture below, you can see how the “Auto-Append” function works both turned ON & OFF.

Posted in BASICS, New in 2012, Settling In, TIPS | 2 Comments

Fillet & Chamfer preview in AutoCAD 2012

Here’s another cool feature in AutoCAD 2012. Both the FILLET & CHAMFER command show a preview of how the fillet or chamfer will look before you pick the second object and finish the command. This allows you to preview and make any changes prior to ending the command.

(picture below: Chamfer)


(picture below: Fillet)

Posted in BASICS, Modifying, New in 2012, TIPS | 17 Comments

OVERKILL in 2012

I recently made a post about the great command called OVERKILL or “Delete Duplicates.” Apparently Autodesk noticed how useful this tool is as well (maybe even from reading this blog site :)… OVERKILL was an “Express Tool” which means that only AutoCAD users who had the full full version of AutoCAD could use this tool. This is no longer the case in AutoCAD 2012. It is now a native tool that is even available in AutoCAD LT versions as well.

Click here to see the earlier post.

The new location for OVERKILL is “Home” tab > “Modify” panel (click the fly-out arrow) “Delete Duplicates.”

Posted in BASICS, Modifying, New in 2012, TIPS | 1 Comment

AutoCAD 2012 Copy Tool with Array option

As seen in the previous tip, in AutoCAD 2012 gives you the option to array objects while in the middle of the COPY command. I previously showed how to array a specific number of copies with the “fit” option.

Now here’s how to do the basic array option in the COPY command. This willallow yoyu to specify the number of copies to array and the distance between them.


To do this:

  • COPY <enter>
  • Select objects <enter>
  • Specify Base Point
  • A <enter> for array
  • Specify the number of copies to array <enter>
  • Pick the end point to specify the distance between the copies
Posted in BASICS, Modifying, New in 2012, TIPS | Leave a comment

AutoCAD 2012 Copy with ARRAY [fit]

So Autodesk released AutoCAD 2012 yesterday (March 22). While I think that every release of AutoCAD has its strengths and weaknesses, I think that this year’s release (to be honest) is just another release with some minor tweaks. One major tweak that is going to make a lot of people mad is the ARRAY tool. The ARRAY tool no longer has a dialog box and is hard to understand to be honest. There are free lisp routines on the internet that are more intuitive and easier to learn than the new array tool.

But for today, let’s look at a new option that is within AutoCAD 2012’s COPY tool.

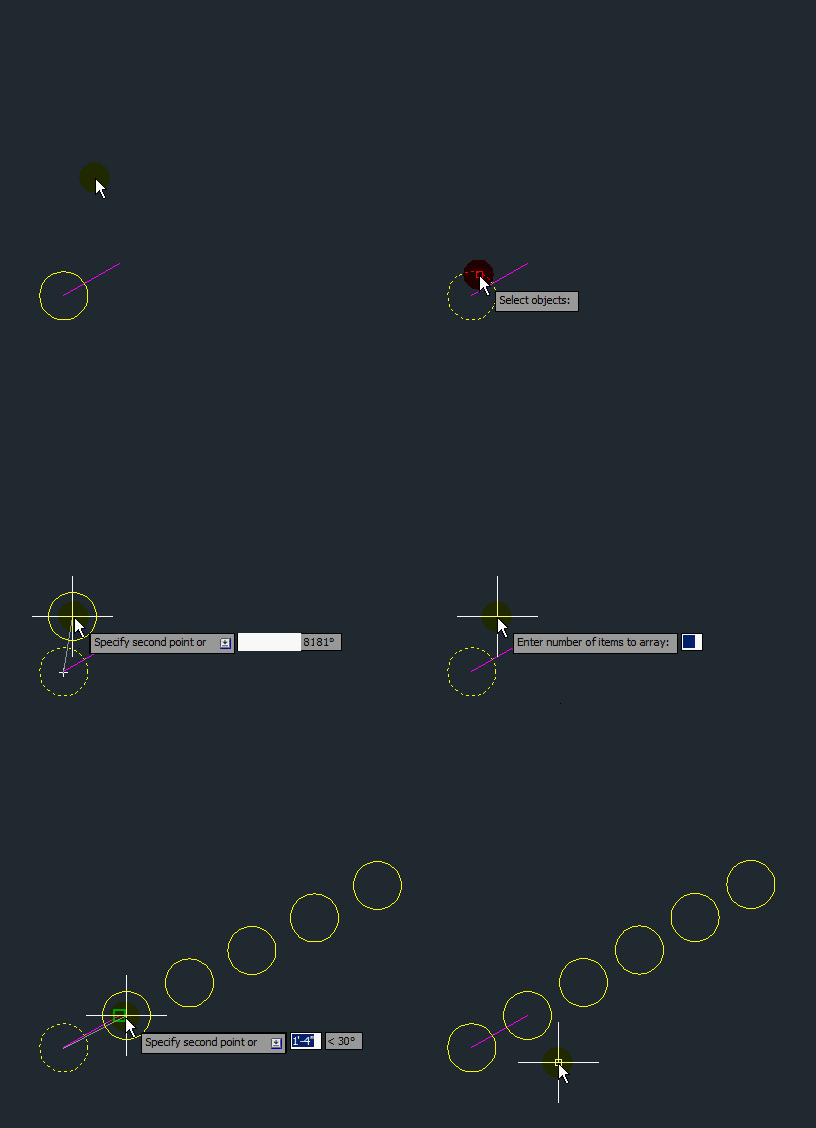
You now have the option to do a linear array while in the middle of the COPY command as seen bellow.


To do this:

  • COPY <enter>
  • Select objects <enter>
  • Specify BasePoint
  • A <enter> for array
  • Specify the number of items to array (I chose 6 for this example)
  • F <etner> to fit these arrayed objects between the base point and the end point that I choose.
  • Pick the endpoint

Now there are six copies of the circle evenly distributed between 2 points

Posted in BASICS, Modifying, New in 2012, TIPS | 1 Comment

Express Tool: Replace Block

Have you ever needed to replace a block throughout your drawing?

Here is an Express Tool that will make your life a lot easier:
(WARNING: this globally replaces the block that you select and you may lose the block if chosen to do so)

  • BLOCKREPLACE <enter> OR
  • From the Express Tools ribbon > Blocks panel select the “Replace Block” button


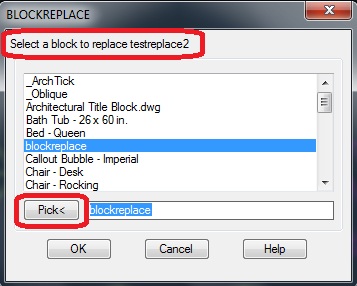
  • From the “BLOCKREPLACE” dialog box, either select the block name from the list or click the “Pick<” button (as seen below). This will allow you to go into your drawing and select an instance of the block that you would like to replace.


  • After selecting the block that is to be replaced, Now the dialog box is asking you what block you would like to replace it with. Again, you can either choose the name of the block from the list or click the “Pick<” button to go into your drawing and select a block.


  • After you select the block that is to replace the other block(s), click OK.
  • You are then asked (in the command line) whether you would like to purge from the drawing, the block that is being replaced. If you plan on using this block in the drawing, don’t purge it.

The blocks have now been replaced throughout the drawing at their insertion points.

Posted in BASICS, Blocks, Express Tools, Modifying, TIPS | 2 Comments