Augi Forums OOPS!!!

If you have ever used google or yahoo to look for solutions for your AutoCAD needs, you have most likely been referred to the AUGI.com forums. When you do a search and see an augi forum link, don’t bother with clicking it anymore. Augi has basically been reset. They have no access to any content that has been posted in the past. This forum should hopefully get back to where it once was. but it will take a long time. It seems that since many people already have number of forums that they frequent, and since the content is gone, that its easier to say, “oh well… just one less forum to check into.” The hard thing was Augi is such a great resource that its hard to watch it flounder. And many people who have posted tips & tricks or LISP code feel like the picture below. I for one will occasionally frequent the forums at Augi but not as much as I use to.

If I have one suggestion, it would be that Augi should have warned people in advance so that they could have saved a copy of whatever content they wanted.

Other Resources:

www.theswamp.org (great source for help with LISP routines and customization)

www.cadtutor.net (another great place for coding help and all around AutoCAD help)

Posted in Customization | Leave a comment

Add Selected

If you have used Revit or AutoCAD Architecture, you may know of the “Add Selected” command. Well, in AutoCAD 2011 we get this awesome command. What’s so special about it?
Especially for the lazy drafter or if you’ve ever received a drawing from someone and maybe they have changed an object to something like the linetype, lineweight or color to something other than “bylayer,” this command will let you pick create that same type of object with all of its properties. It doesn’t matter what your current settings are or what layer you are on.

To do this:

  • Select an object
  • Right click
  • Select “Add Selected” from the right-click menu
  • Create the object
    It’s that simple!!!!


Posted in BASICS, Modifying, New in 2011, TIPS | 1 Comment

Copy with Base-Point

have you ever needed to copy an object from drawing to drawing but were annoyed with not being able to specify a basepoint? Well you probably used CTRL+C to copy and CTRL+V to paste, right?

Try using CTRL+SHIFT+C to copy.
It will ask you to specify a basepoint, then ask you to select the objects then hit enter. Or
Select the objects first then CTRL+SHIFT+C then specify the basepoint.

Now when you do a CTRL+SHIFT+V, you can snap your copied object.

Posted in BASICS, Modifying, TIPS | 6 Comments

From REVIT to PDF

I know… I know…
This aint AutoCAD, but it is something that people at school ask about a lot and it is a really needed task that is missing from REVIT.

So bare with me as I show you this work-around.

This method of making PDFs of your Revit model requires Power Point.

  • With your Revit model open, open the    “application menu” (the big purple R).
  • Select “Export”
  • Select “Images & Animations”
  • Select “Image”

In the picture below, the dialog box on the right will appear first.

Change the “Fit to” (pixels box) to something above 700. I chose 1080 randomly.

Change the “Zoom to” (%) to 100%

Change all of the formats to either a TIFF or PNG format

If you have multiple sheets that you would like to turn be in your PDF click the “Select…” button. This will bring up the dialog box on the right as shown above. Select the sheets that you want to export. There should be a check next to the name that you select. Click OK when finished selecting sheets.

At the top of the Export Image dialog, The top area called “Output” is where you choose where the pictures will be exported to. Simply click the “change” button and navigate to where you would like these images to be stored.

Now click OK at the bottom of the dialog box and let Revit export these images. Since these are high quality images, it may take several minutes.

After the images are made, open the images and verify that they are good enough quality by zooming into them. If you can zoom in to them and they are not pixilated, they will be fine for this process.

Open a new session of Power Point

Now we need to set up the Power Point for our project.

In the left column of “slide previews” there should be one slide.
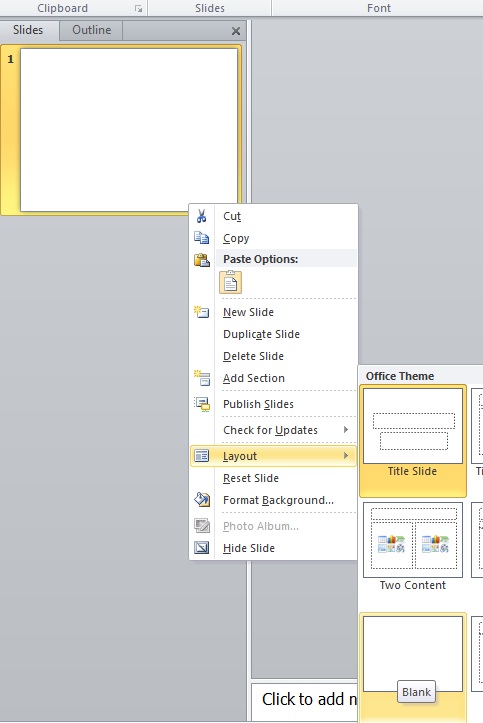
  • Right click the slide
  • Select “Layout”
  • Choose “Blank”


Setting the Page Size:

  • Click the “Design” tab
  • Click “Page Setup”
  • Enter the size of paper you would like the print to beI entered: 36 = width and 24 = height for an ARCH D print. Set the Actual paper size for plotting (don’t use 8.5″X11″as your page setup unless that is the desired plot size).
  • Click OK

Insert Images

If you have created more than one Image to be made into a PDF, you need to add one picture per slide.

To do this, right click the “slide preview” and select “New Slide.”

  • Activate the slide in the slide preview
  • Click the “Insert” tab
  • Select “Picture”
  • Now navigate to the picture that you want to add to that slide.
  • Repeat this process to add the images to the slides.
  • If the slides get out of order, simply drag them into position in the slide preview area.
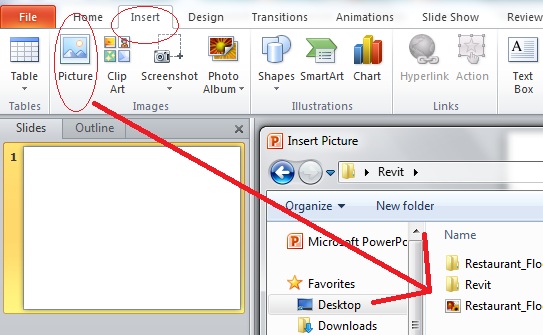
Once you have the images inserted and the desired order of the slides, we can now make our PDF.

(Note: I am using Office 2010 so my layout may look different than but should work the same)

For Office 2007, click the application menu in the upper left of the screen

  • For Office 2010, click the red “File” button
  • Click “Save as”
  • Choose PDF from the list.
  • Choose the destination where you want the PDF to be saved.
  • Name the project.
  • Click “Save”

~Enjoy!!!

Posted in Revit, TIPS | 3 Comments

MATCHPROP

I think that the tool MATCHPROP is one that is easily forgotten or goes unnoticed. Yet is will save you a ton time.
It works like the “format painter” that is found in Microsoft Office products for those who know that tool.
Let’s face it, we all draw objects and forget to create them on their respective layer. This tool will save you the hasel of remembering what layer an object is on or if there were any changes to color, linetype or lineweight that may have been changed to something other than  “bylayer”…

  • Enter the command MATCHPROP
    or on the far right of the home tab/ribbon, click the MATCHPROP button
  • Select an object in the drawing that has the properties that you want to copy to other objects
  • Select the objects that you want to take on those properties


Posted in BASICS, Modifying, TIPS | 1 Comment

More SNAP over-rides

Ever want to snap to just an endpoint but you have too many osnap settings on?
You could just turn some of them off, then snap to what you want, but then you would have to turn back on the settings that you just turned off.

To over-ride your OSNAP settings and snap to what you want simply:
Hold SHIFT+E or M or C
E-Endpoint
M-Midpoint
C-Center

Posted in BASICS, TIPS | 1 Comment

TSPACEINVADERS

This is a cool tip to find and select any text in your drawing that has an object that is overlapping or “invading” it.

This command will create a selection set of the text objects that have geometry and even other text objects that overlap it.

command: TSPACEINVADERS <enter>
Select objects by a window or type ALL <enter> to select everything in the drawing.
The commandline will now say something like “2 text objects were found to have overlapping objects. Step through each one for visual verification? <N>:”
It asks you if you would like to verify each instance that it found. By deafault it is set to No. If you answer “Y” for yes, it will automatically move and zoom around the drawing and show you each instance and ask if you want to add this instance to the selection set. The only problem that I found was that it doesn’t highlight or distinguish which instance it is refering to.
After you either filter through the selection or you take the default <N>, the command ends and it created a selection set that you can now edit by moving or adjusting.

Before TSPACEINVADERS

After TSPACEINVADERS

Posted in BASICS, TIPS | 4 Comments

Auto-Align your Blocks

Some people live in a square world, but for us who live in a drafting world, there are angles galore. Luckily for us, when we bring blocks into our angled drafting environment, we no longer have to use the ROTATE or ALIGN commands.

How do you do this?…
DYNAMIC BLOCKS!!!!!
Some may be intimidated by dynamic blocks, but don’t worry, this will be a pain-free intro into dynamic blocks. Let’s start.

  • Open a drawing that contains the block that you want to align
  • Insert the block into the drawing and double-click the block  or:
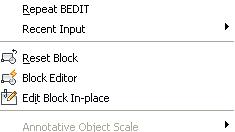
  • Insert the block, select the block, right-click and select “Block Editor” in the right-click menu.
  • Type BEDIT into the command line and select the name of the block and hit OK
  • This opens the awesome “BLOCK EDITOR”
  • For some, this is new. The block editor allows you to edit your block without exploding it. This is especially great for editing blocks with attributes.
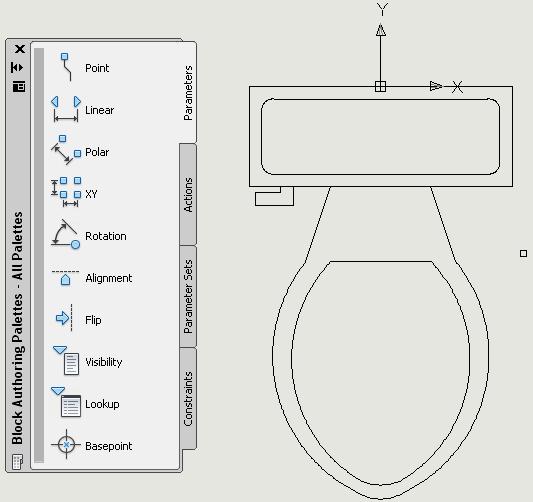
  • Don’t close the palette that is on the left of the screen. This is the ”Block Authoring Palette” and we need this to apply the dynamic functions to our block.
    • (Before we apply a dynamic function keep this is mind. An action needs to be applied to a parameter. If you go on to learn more about dynamic blocks, you will need to apply a parameter and then apply an action to that parameter or else your dynamic block will not work. There are exceptions like our project). With that said…
  • The tab on the “Block Authoring Palette” that we need for this project is the “Parameter” tab.


  • With the “Mid Point” osnap on and OTRACK turned on, click the “Alignment” button in the “Block Authoring Palette.”
  • Now use OTRACK and track up from the mid-point of the back of the toilet 2 inches.
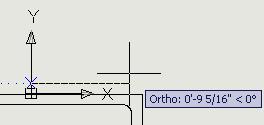
    • To do this, hover over the mid-point of the back of the toilet. Hovering over a point activates the OTRACK. Now pull your cursor up and a dashed line should appear. This is your “TRACK PATH.” Type in 2 . This is the starting point for our alignment.
  •  Move the cursor to the right 90 degrees. Your cursor should say zero degrees.


 · Simply click anywhere to the right as long as it as at zero degrees.

  • That’s all that we need to do in the block editor, so close out of it by clicking the “close” button to the far right in the ribbon.
  •  A dialogue box will pop up and ask you to save the changes to the block, click the option to save changes.

Now that we are done if your block is in your drawing or if you insert the block, select the block. You will notice that the insertion point for the block is now not even touching the block. This is correct. We don’t want our block to be have its back line overlap the wall.

When you now insert or move your block (from the grip) it will align itself to any angled wall ! !

Posted in Blocks, Customization | Leave a comment

MTJIGSTRING

Okay, that heading was not very descriptive, but I know that you’ll enjoy this tip.
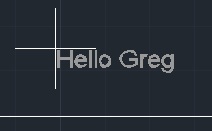
When you place MTEXT, by default, it is blank. And by “blank”, I mean that there is no preview of text so that you can see how it will look when you are finished typing.

The System Variable MTJIGSTRING allows you make such a preview.
Here is the description from the System Variable editor:
Sets the content of the sample text displayed at the cursor location when the MTEXT command is started.
The text string is displayed in the current text size and font. You can enter any string of up to ten letters or numbers or enter a period (.) to display no sample text.”

In the command line:
MTJIGSTRING <enter>
enter new text preview up to 10 characters including spaces <enter>


Posted in Customization, Settling In | 2 Comments

Angular Dimensions larger than 180 degrees

Believe or not, you may need to make an angular dimension that is larger than 180 degrees at some time. But if you use the angular dimension tool and then select the two lines that you want to reference, it will not do a dimension larger than 180 degrees.

To do this:
DIMANGULAR <enter>
NOTE – look at the command line. It says “Select arc, circle, line, or <specify vertex>:”
hit <enter> to choose the specify vertex option
1 – pick the vertex (corner) of the angle
2 – pick one end of the lines
3 – pick the end of the other line
pull the dimension and place it.

The picture below shows the usual DIMANGULAR use and results on the left and on the right, the <specify vertex> option and where to pick.


Posted in BASICS, Dimensions | 3 Comments