Hopefully, today’s tip will help you AutoCAD “newbies” and you “old schoolers”
The POLYGON tool in AutoCAD creates “Simple Polygons” that are symmetrical.
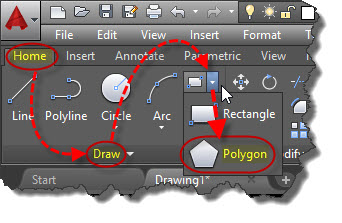
The Polygon tool is located on the Home tab > Draw panel > next to the RECTANGLE tool there is a pull down arrow, under that list is the POLYGON tool.
- Command line version: POLYGON <enter>
Command Alias: POL <enter>
Method One: Making a Polygon From a Center point – Out (like a circle)
- Once the tool is launched, you are asked to “Enter the number of sides:” of the polygon
- You are then asked to “Specify the center of the Polygon.” You can do this by simply picking a point in the drawing area.
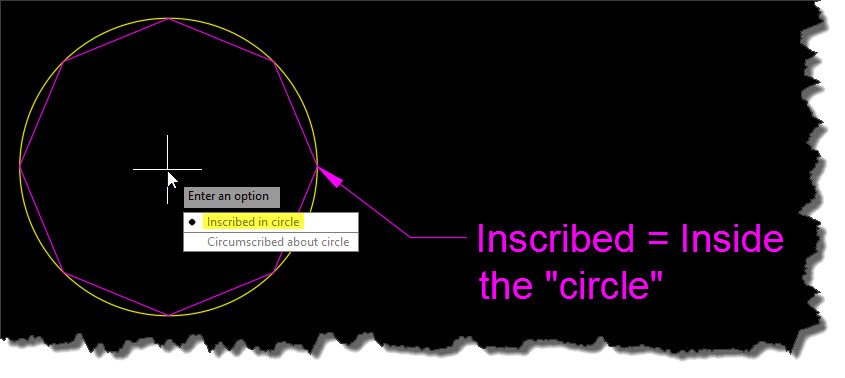
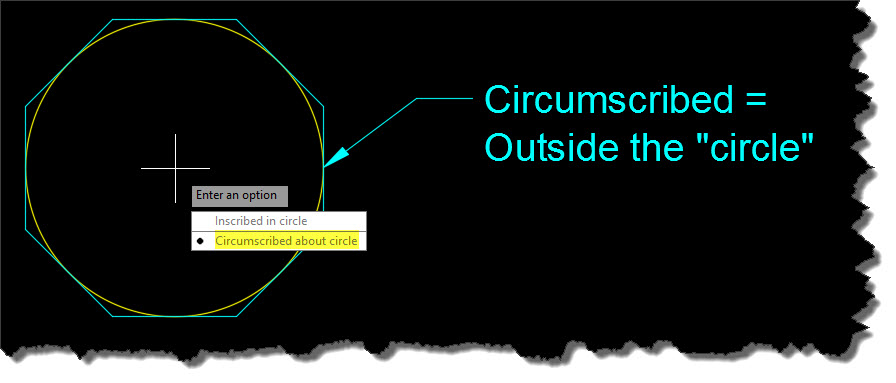
- Then you are asked if the polygon should be “Inscribed” or “Circumscribed“. This may be confusing for new users but it also trips up users that are “old pros” that have been using AutoCAD for a long time.
- The last prompt is “Specify the radius of the circle:” which sounds confusing because it sounds like you are now creating a circle somehow…
Shown below are some examples that illustrate Polygons in relation to a circle. The circle and the Polygons share the same center point and the same radius. This illustration hopefully makes it easier to understand the prompts and which part of the polygon rests at the “radius” point. I also have to give the AutoCAD team kudos for adding a description after each option (Inscribed & Circumscribed) in newer releases of AutoCAD. It used to just ask you to specify an “I” for Inscribed or “C” for Circumscribed.
The arrow shown below that is labeled “Distance” shows the center point (back end of arrow) and the radius (at the arrow end).
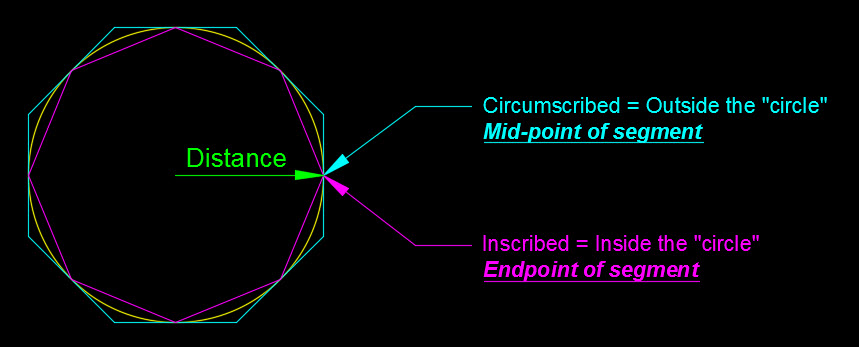
Inscribed & Circumscribed polygons with the same center point and the same radius
- Inscribed:
When you specify the radius of an inscribed polygon, you are defining where a corner of the polygon will be placed.
- Circumscribed:
When you specify the radius of a circumscribed polygon, you are defining where the midpoint of one of the edges or segments of the polygon will be placed.
COOL TRICK
The “Cool Trick” that is mentioned in the title is something that is sometimes overlooked. It is an option that we glance over when the POLYGON command is launched. It is the “Edge” option. This is especially useful when creating a circumscribed polygon. Instead of specifying a center point and a radius, you define the length and angle of an “edge” of the polygon.
- Define the Edge’s Angle & Length:
Watch the Dynamic Input as the angle and length are entered to define the edge.

- Referenced Object:
Shown below is simply an angled line with a distance and angle that I don’t know – but I want my polygon’s edge to be that length and at that angle Quickly…

The Coolest trick is using the edge option to make a square. You simply tell it to make 4 sides – then pick 2 points and voila you have a square!!!