Moving Around In Your Text

This is a little tip that will help you move around text. It works in AutoCAD and Word and I even tested while in my blog text editor and it works. If you would like to move your cursor to switch to the beginning of the next word, simply:
Hold down CTRL and use the LEFT or RIGHT arrow buttons.

To jump to the bottom or top of the paragraph:
Hold down CTRL and use the UP or DOWN button.

(The cursor in the below picture may be hard to see – sorry)

Posted in Text, TIPS | Leave a comment

Portfolio1

1525_Blue_Jay1

1525_Blue_Jay2

I am currently looking for a possible job in drafting and thought that I would post some past projects here for anyone who is considering hiring a drafter.

This project was for a house that I saw online. I asked the architect for anything that could help me recreate the main floor plan and use it for my Fall 2010 AutoCAD classes. the Designer, Lori Dennis graciously provided me with PDFs of some floor plans and elevations. I was able to import the PDFs and scale it and then basically trace over the lines to reproduce the features that I needed for my project.

The house can bee seen at www.1525bluejayway.com

You can also visit the designer’s website at www.loridennis.com

Posted in Portfolio | Leave a comment

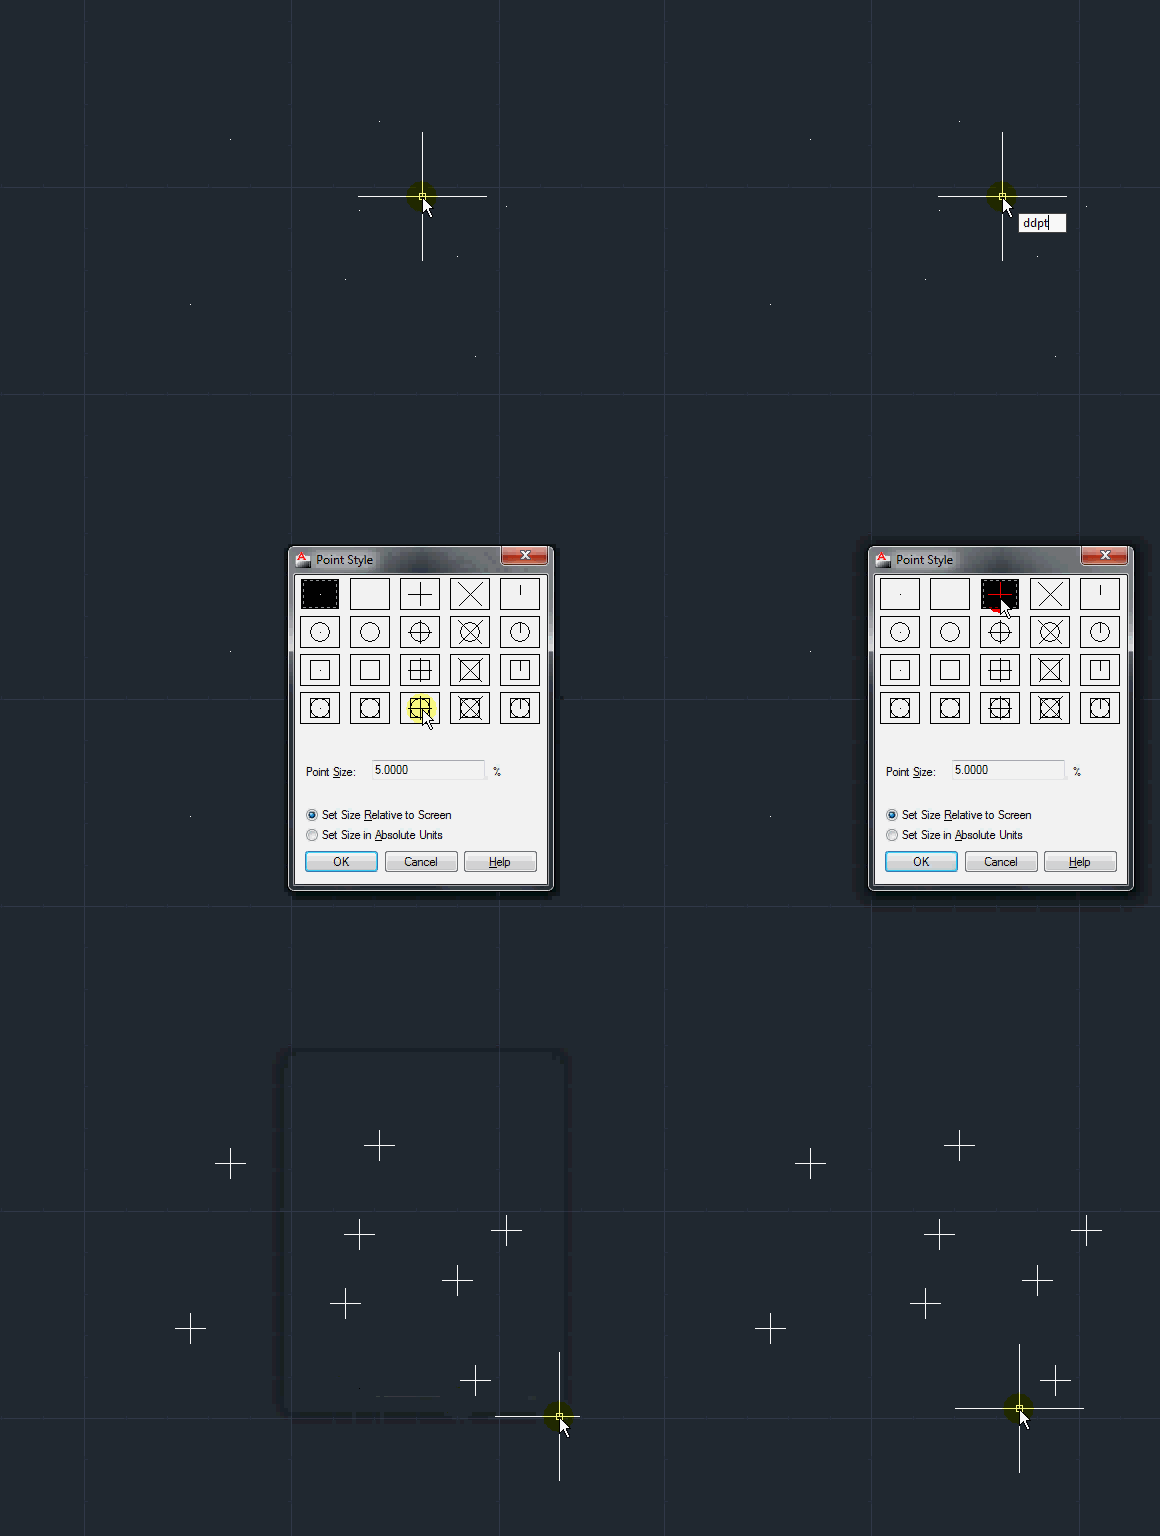
Point Size

If you have ever been frustrated with the size of POINTs in your drawing, there is an easy way to change the size and the way they appear in your drawing.

The command is DDPTYPE and it will open a dialog box where you can set the size and look of your POINTs.

Instead of using the commands “PDMODE” & “PDSIZE” & having to know the numeric size setting, this handy dialog box shows previews of how they will look.

Posted in BASICS, Customization, TIPS | 39 Comments

Leaders with Shapes Made Easy

You may know that you can create a MultiLeader style that incorporates a shape at the end of the leader like a square or circle – this is useful for making keynotes and legends. The problem with this is that if you need multiple shapes, you need each shape to have its own multileader style. And after a while, it may be hard to keep track of what style is what.

The solution is found in the tool palettes. Simply enter TP <enter> in the command line to open the Tool Palettes and click on the “Leader” tab and hooray!! Simply drag the desired leader shape into the drawing area and double click on the text to enter your own text. Note: These leaders are not meant for large amounts of text. They are mainly used for limited text that will fit within the given shape.

Update!!! (February 2019)

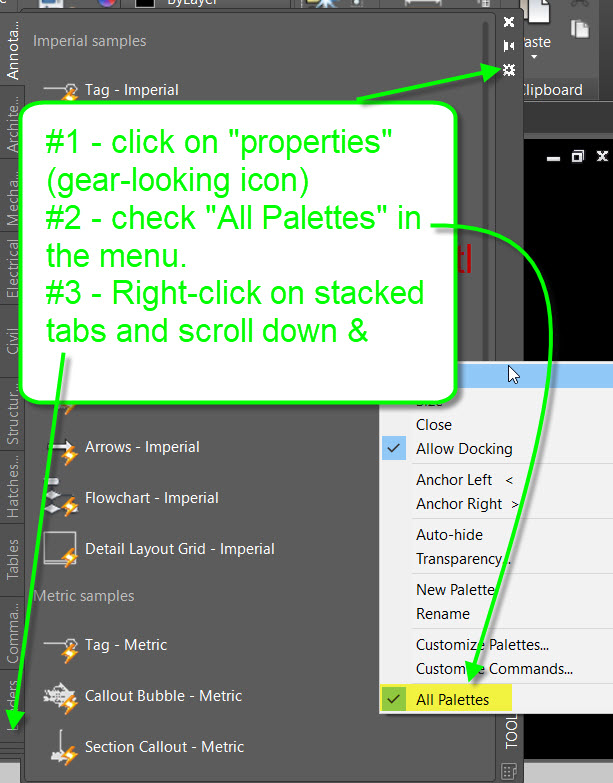
Something I missed at the beginning of this post is how to display the “Leaders” tab when you don’t see it in the Tool Palettes.

If you do not see the Leaders tab, you must turn on the display of  “All Palettes” from the properties of the palette. To do this, you can left-mouse-click on the gear icon located on the side of the tool palette, or you can right-mouse-click along the edge of the tool palette. From there you should see a menu and at the bottom of the menu, click on “All Palettes” so that there is a checkmark next to “All Palettes”.
All of the palettes available from AutoCAD are now able to use and there are many useful tabs. In order to see all of the possible tabs, you need to right-click over the little area located at the bottom of the palette tabs. The little area of stacked tabs is where you need to right click. From there, you can simply scroll through and select the tab that you need. For the example of this blog post, select “Leaders” from the list.
~enjoy

Posted in Attributes, Blocks, Leaders, Text, TIPS | 4 Comments

Text Mask for Dims & MLeaders

I recently learned this great tip and am eager to share it here.

Adding text masking to Text & MText is easy in 2011 but many people just give up when it comes to adding them to Dimensions or MultiLeaders. Here’s how:

1) Before starting – Use one of the DRAWORDER commands to make sure that the dimension/MLeader is at the front.

  • the TEXTTOFRONT command will bring all text objects including Mleaders and Dimensions to the front
  • The HATCHTOBACK command will send all hatches to the back of the drawing order.

2) Select the dimension or multi-leader > Right-Click > Select Properties


Once in the Properties Palette, scroll down and find the “Background mask” button. It will say “No.” Simply click on “No” and choose “Yes” from the drop-down list and close the properties palette.

Now, your Dimensions and MultiLeaders can be easily read when the are in a hatch or are overlapping an object.


~enjoy!!

Posted in Dimensions, Leaders, Modifying, Text, TIPS | 8 Comments

QTEXT

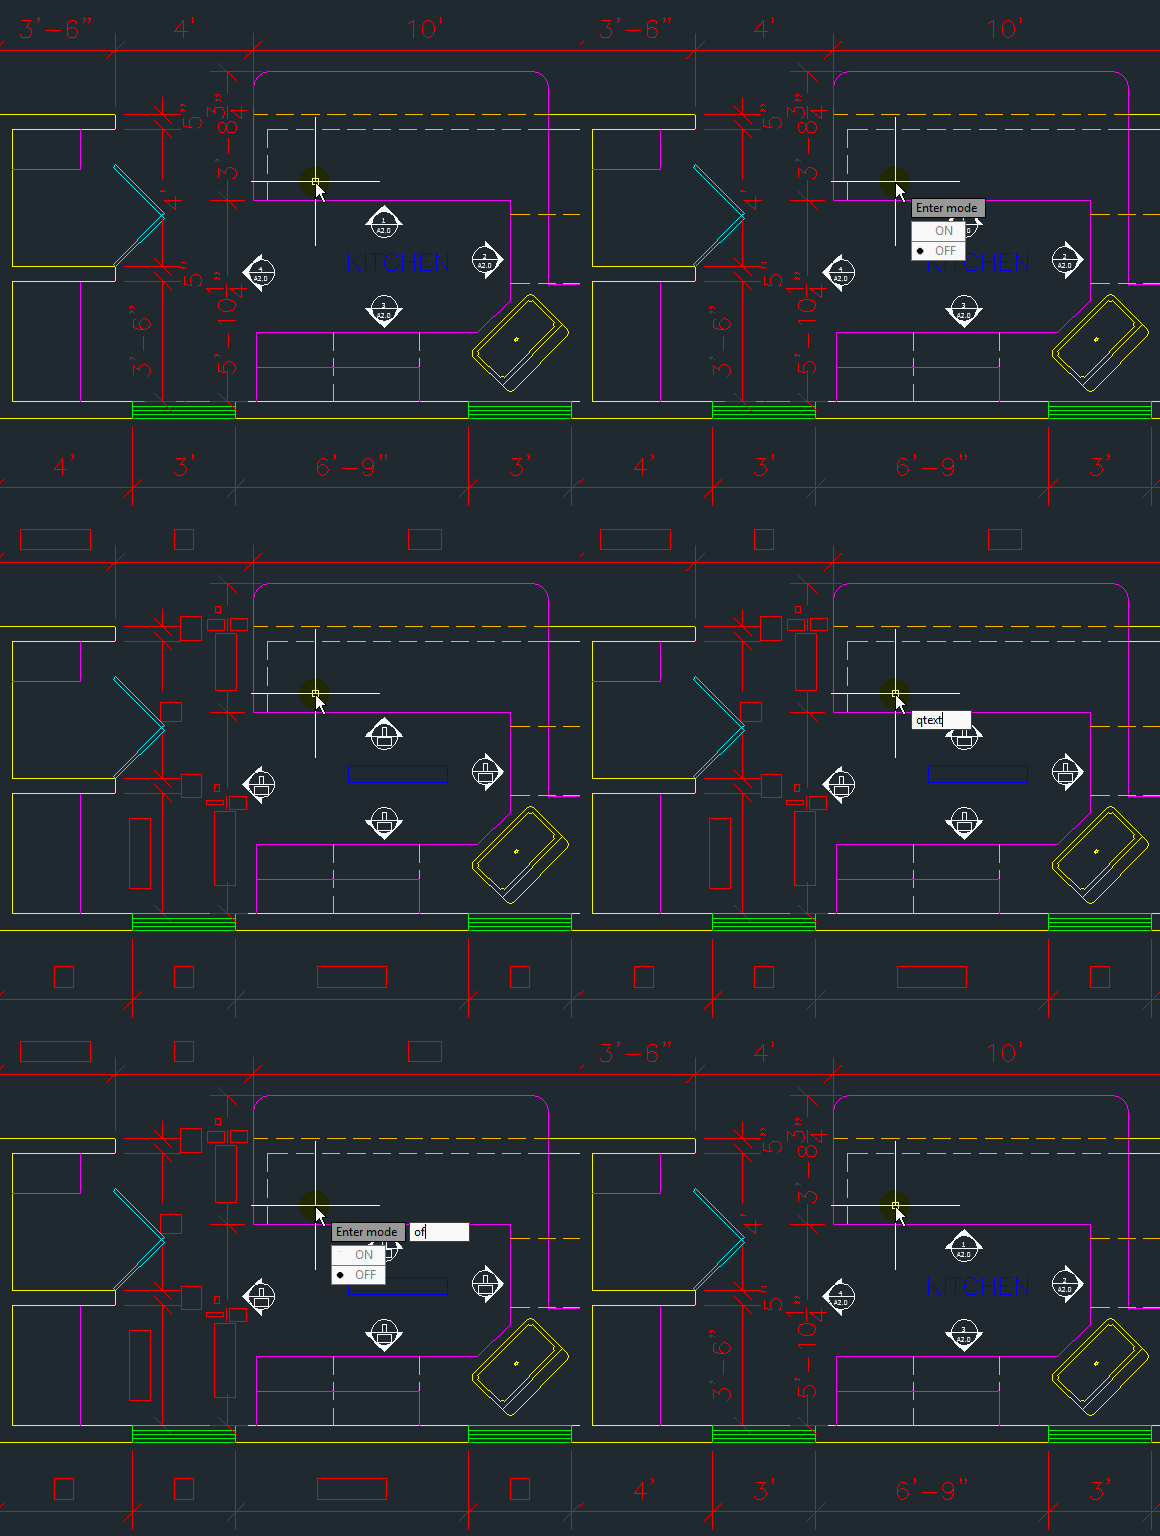
Large amounts of text in a drawing can slow down your drawing session. AutoCAD regenerates whenever you pan and zoom, so when you have a lot of text in your drawing, you have the option of temporarily hiding text in your drawing to speed things up.

To do this:
enter QTEXT at the command line
enter ON at the command line (or with DYN on, click ON)
Now enter RE at the command line to regenerate the drawing and for the text to be hidden.

QTEXT <ON>

QTEXT <OFF>


I just figured out how to make animated pictures so here’s my first.

Posted in Attributes, BASICS, Dimensions, Text, TIPS | 1 Comment

MLeader quick fix

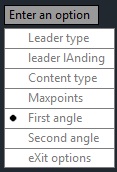
Last semester I was trying to help some with a problem with their MultiLeaders and I had no idea how to fix it. The problem was that when they started the MLEADER command, the 1st pick point ended up being their text landing and the 2nd point was where the arrow pointed. In case you don’t know, this is backwards from the default option and is extremely frustrating. I couldn’t think of how to fix it so we restarted the computer, and since the school computers reset AutoCAD to its default settings, it was fixed.

This was still frustrating for me so I remebered something that plagues AutoCAD drafters: LOOK AT THE COMMAND LINE!!!!!!

There it was in the command line the whole time. There are options there that I had never heard of and figured out that if I enter H at the command line, the arrowHead will be placed first.

There are a number of options/settings that are very helpful. One of the options is to set the angle of the arrow & line so that they are uniform.

~enjoy

Posted in BASICS, Leaders, Settling In, Text, TIPS | 1 Comment

The Select Command & Selection Options

This was an interesting find: I learned a new command called “SELECT” the other day. Use it to make a selection set prior to using a command. Then when you start a command and it asks you to “Select Objects:” enter P (for previous) and the selection set that you previously made will be used

–__–__–__–__–__–__–__–__–__–__–__–__–__–

Options when selecting objects

When you are asked to “Select Objects: ” you have options.

before selecting objects when prompted to do so, (even in the above command) choose one of these options:

Window/Last/Crossing/BOX/ALL/Fence/WPolygon/CPolygon/Group/Add/Remove/
Multiple/Previous/Undo/AUto/SIngle/SUbobject/Object

  • W for Window
  • L for Last
  • C for Crossing
  • BOX
  • ALL
  • F for Fence
  • WP for WPolygon (Window Polygon
  • CP for CPolygon (Crossing Polygon)
  • G for Group
  • A for Add
  • R for Remove
  • M for Multiple
  • P for Previous
  • U for Undo
  • AU for AUto
  • SI for SIngle
  • SU for SUbobject
  • O for Object
Posted in BASICS, TIPS | 7 Comments

Command: MULTIPLE

Some commands in AutoCAD have the option to choose M for Multiple so that you can continue using the command after the first use, and also so you don’t have to restart the command. A command that does not have a multiple option is the CIRCLE command. After you pick the center point and then specify the radius, the command ends. Wouldn’t it be nice if you could continue picking away without restarting the command?

Here’s how

  • Enter MULTIPLE at the command line and you can then enter the command that you want to use the multiple command with. Then pick away.
  • To exit the command hit esc a couple of times.


Posted in BASICS, TIPS | Leave a comment

Hatches in 2011


The new Hatch contextual ribbon (instead of the old dialog box) is a very cool addition to AutoCAD. With this new feature when you hover over an enclosed area (where the hatch will go) the hatch shows a preview of how it will look.

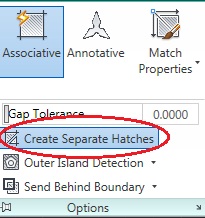
Another great feature is that you can create multiple separate hatches without having to start the hatch command repeatedly. Note-this only works when “Create Separate Hatches” is turned on found in the Hatch ribbon > Options panel. (seen below)


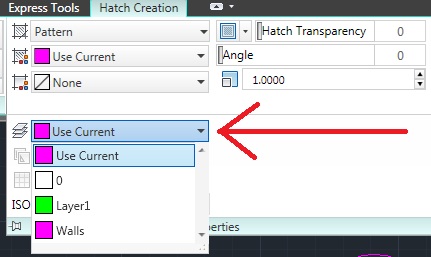
If you’ve ever made a hatch and then realized that it was on the wrong layer, you’ll appreciate this other new feature. While creating your new hatches, expand the Properties panel and select the layer that you would like the hatches to be on.

(seen below)


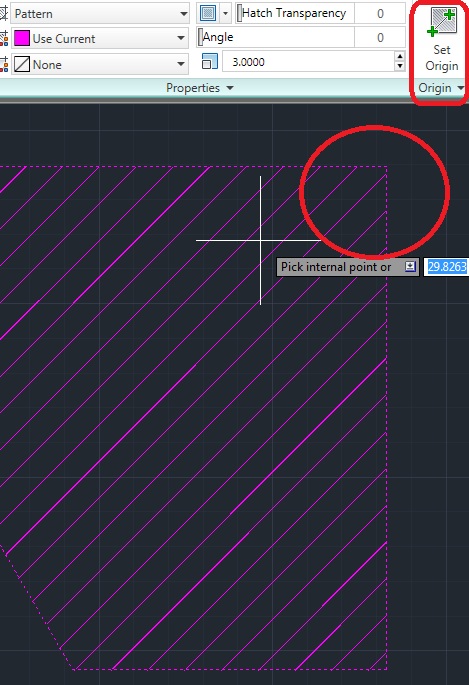
A function that is not new to 2011 but is either not known or to is easily forgotten is the “Set Origin” function. this is helpful when you are either creating or editing a hatch that needs to line up with a corner or other point. To do this:

Select the hatch to be edited, and then select “Set Origin”  found in the “Origin” panel (this tool has its own panel).


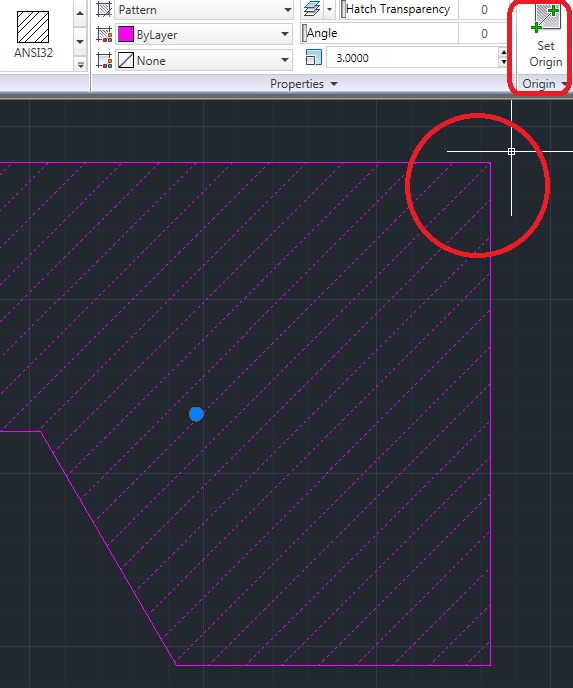
Now that you have started this command, all you have to do is select the “Origin.” In this example, I picked the upper right corner. The hatch will adjust itself around the new Origin point.
Posted in BASICS, New in 2011, TIPS | Leave a comment