Isolating – Great for 3D

New in AutoCAD 2011 is the ability to hide or isolate objects that you select. This is a very simple, yet powerful tool that is especially helpful for working in 3D. After hiding/isolating, you can easily orbit and position your view so that you can more easily work on your 3D model.

Below, is the one of Disney’s “Friendship” boats in 3D AutoCAD
(I know, I accidentally mislabeled it…)


  • Make a selection set of the objects that you want to either isolate or hide. In the following example, I use the “Isolate” option.
  • Right-Click and click the “Isolate” fly-out.
  • Select “Isolate Objects” (as seen below)


As you can see below, everything except the objects that were previously selected have been hidden, giving you easy access to work on your 3D model.


When you are finished with isolating objects and want to restore the rest of your model:

  • Right-Click and select
  • Click “Isolate”
  • Select “End Object Isolation”


You can now go back to editing your full 3D model.

Posted in BASICS, New in 2011, TIPS | Leave a comment

Selection Cycle

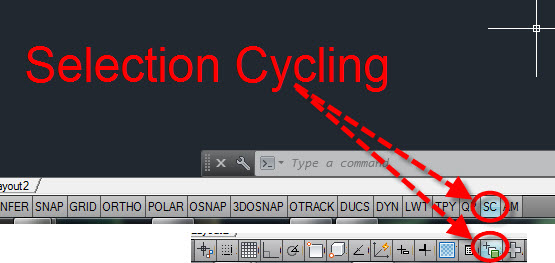
Another great addition to 2011 is the Selection Cycling (SC) toggle found on the Status Bar (drafting setting buttons). If you have objects that are overlapping and you want to select one of them, your only option was to hold SHIFT and hit the spacebar while hovering over the stacked objects. You can still do this method but there is this (SC) toggle that will come in handy.

With SC turned on:

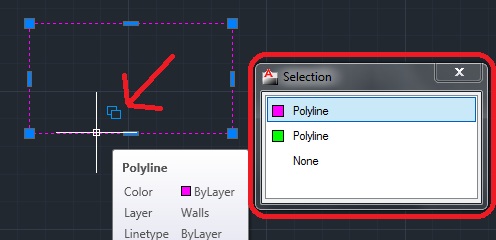
  • Hover over the overlapped objects and you will see a blue icon that appears next to your cursor.
  • Click on the overlapped objects and a “Selection” box appears that shows the color of the objects and what the object is made of (line, circle, polyline)…
  • You can either click the desired object from this list or use the up & down arrows to highlight the object, then hit enter to select it.


Note: when you are zoomed out and hovering over objects, the SC icon appears, so I wouldn’t suggest that this be toggled on all of the time.

Posted in New in 2011, Settling In, TIPS | 3 Comments

Infer Constraints


It used to be (and still can be) that you could only apply constraints to objects after they were created. One problem that we frequently ran into especially using the “auto constrain” tool was “Over-Constraining” these objects.

New in 2011 is the INFER toggle on the status bar (drafting settings buttons).
Turn this toggle on and start drafting and don’t worry about the constraints. they will take care of themselves.

Posted in BASICS, New in 2011, TIPS | 2 Comments

Adding Text to your Dim

I have seen a few Lisp routines that allow you to add a line of text under your dimension. I thought that it would be helpful to show that you don’t need a lisp routine to do this. You just need to know where to edit…


Above: Unedited Dimensions

To add text so that is underneath the dimension but also above the dimension line:

  • Type ED in at the command line and hit <enter>
  • Select the dimension to edit
  • move the text cursor to the right of the dimension value and hit <enter> This will create the new line below the dim value.


Above: Using ED to edit Dimension text

To add text that is below the dimension value and the dimension line:

  • Select the dimension to edit
  • Right click and open the Properties palette
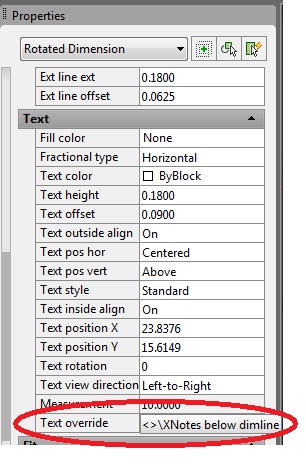
  • Scroll down in the Properties Palette to the Text section of the Palette and then activate the “Text override” text box.
  • I used the following to achieve the below text: <>\XNotes below dimline
  • The Important thing is the <>\X portion. This creates the new text line below the Dim value and the Dimension line.


Above: Properties palette where <>\X is entered


Above: Text below Dimension Value and Dimension Line

Posted in Customization, Dimensions, Modifying, Text, TIPS | 4 Comments

Hatch Boundary in 2011

If you have ever erased a hatch boundary before you’ll appreciate this tip.

Simply select the hatch whose boundary has been erased

Right-click and select “Generate Boundary” as seen below. This will recreate the boundary as it was originally created.

Posted in New in 2011, TIPS | Tagged | Leave a comment

Easy Text Masks for 2011

Here’s a quickie
If you have text that is overlapping objects and you don’t want these objects intruding your text space….

<TEXTMASK> will start the command. Simply select the text objects that you want to have a mask. And when you’re done, hit <enter>.

<TEXTUNMASK> will start the unmask command. Select the text objects that have masks and hit <enter> and this will remove them.

(these tools are located in the express tools)

There are other settings that can be applied to these masks as seen in the command line. But more importantly is how to control the mask if you need to move it. If you use the move command to move the text after you have applied the text mask, the text will move but the mask will remain in its place. To counter this, there is a toggle that controls groups. The text mask is created as a group with your text but it is turned off by default. To turn on & off the group: hold Shift+Ctrl+A. This does not allow the same type of text-move that you are used to, where you select the text and grab the grip to move it around. This works with the move command.

ABOVE: Text Mask applied

ABOVE: Text UnMask applied

Posted in New in 2011, Text, TIPS | 5 Comments

Express Tools for ACAD Architecture 2011

Yet, another program that’s not vanilla AutoCAD but still relavent.

In AutoCAD Architecture 2011, you may have noticed that after installation, there are no Express Tools. I realized that after I installed the program that I forgot to install the Express Tools. My search for help on the internet was frustrating because most everyone’s advice was to make sure that you load it upon installation. Well I didn’t feel like uninstalling and then reinstalling so I found this very helpful.

In the command line, type MENULOAD <enter>

  • 1) click the “Browse” button in the Load/Unload dialog box
  • 2) select the “acetmain” .cuix menu file
  • 3) click “Open”
  • Back in the Load/Unload dialog box, with “acetmain” highlighted in the box click “Load” (Note – it may say “Express” in this dialog box.

When you click load, it will close the dialog box and load that new menu. Be patient and it will load the Express Tools.

Posted in Customization, New in 2011, Settling In, TIPS | 8 Comments

Parallel OSNAP

many people know that there is a “Parallel” osnap, but do you know how to use it?
Here’s how…

With the Parallel osnap turned on:

  • Specify the starting point of the line
  • Hover over the line that you want to be parallel to (reference line)
    • the parallel icon will stick to the reference line
  • Move the cursor in the direction you want the new line to go
    • when your line is parallel , there will be a dotted line that appears
  • Enter the length of the line or pick to specify the end of the line


Posted in BASICS, TIPS | 1 Comment

In Defense of the Ribbon

In Defense of the RIBBON

In the past year, I have made the switch to AutoCAD’s ribbon interface. I would show up to class and changed my workspace to the classic interface with the lovely toolbars. I would look at my fellow students and see them using the ribbon and wonder how they were able to function. Until I heard that there were rumors that Autodesk would eventually get rid of the “Classic” workspace and I thought to myself, ‘Autodesk isn’t doing this to make things harder, they do these things to make drafting easier, (and to copy whatever Microsoft does…) so I should at least try it.’

After about 3 days I was moving around the ribbon fairly easily and really enjoying it. I even found that people’s arguments against the ribbon were unfounded.

What I found is that the beloved toolbars in classic are indeed the panels in the ribbon. And these panels are logically organized by a tab. These panels in the ribbon even have more options than the toolbars have. These panels even have display options that the toolbars don’t even have. If you don’t know what a button is in the toolbar, you have to hover over the button to see that name of it. However, in the ribbon, you can have it just show the buttons (like the toolbar) or show the buttons and text. Try that with the classic toolbars…

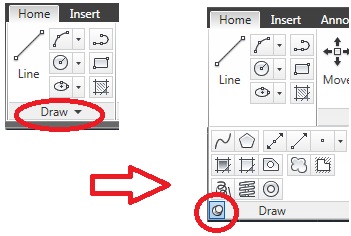
Draw Toolbar & Panel compared:
above. Draw Toolbar has 20 buttons.

Draw Panel has 36 buttons. 16 of which are not available in the toolbar.

Notice that the draw panel is on the “Home tab” or “Home Ribbon” You may hear people use “tab” and “ribbon” interchangeably. The draw panel is the section on the ribbon dedicated to drawing tools/buttons. Whenever you see an arrow next to the name of a panel it means that there are more tools available. Simply click anywhere on the lower portion where the name of the panel and arrow reside and the panel will expand.

Notice that the buttons look the same as they do in the toolbar. But the buttons found in the panel have more options.
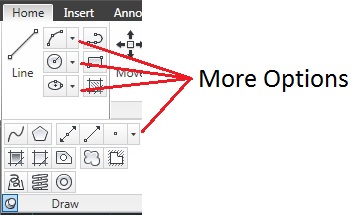
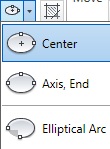
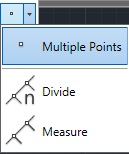
If you click on these arrows, more options will appear.


Some of these options are available in the classic setup but only if you see the options in the command line when starting the command or you know how to call the function in the middle of the command. There is 1 circle command that I know of that does not work in the classic setup at all (unless you use a lisp routine). And that is the circle with the “TTT” or “tangent, tangent, tangent” option. It will work with the Ribbon but not with Classic.

With these dropdown buttons, the last option that you use will be seen next to the dropdown arrow when the list collapses or when you are down with the command.

If you like creating your own toolbars, you will love crea

ting your own panels and ribbons/tabs. You can create custom panels and ribbons in the CUI. You can show the buttons at different sizes and even have text appear next to the button so that you don’t have to hover over the button to find out what it is.

In this Blog post, I am not going to show how to create a new ribbon or panel (I will save that for its own post) but I will show you how to alter buttons in the panel to have a text label show next to the button.

Type CUI in the command line. Or click the “Manage” tab and in the “customization” panel, click the User Interface button. As seen below


This will bring up the “Customize User Interface” dialog box as seen below.
To show text next to buttons, follow these 3 steps
I changed the Spline and hatch buttons to show text next to the button, because I tend to forget what buttons they are.

While in the CUI:
Follow these 3 steps

In area 1

Click navigate to the draw panel by following the picture below


In area 2 (preview panel)

Click on the button as it appears in the panel.
This will open the properties for that button in area 3

In area 3

Click the “Button style” dropdown list and choose an option. The option I chose was “Small with text”
Click “Apply” & “OK”

Now your buttons will show text and you don’t have to guess or hover over the buttons.

Overall, I think that the ribbon is a great feature. Even though I like to use the command line and use aliases a lot. The ribbon helps from looking down at the keyboard and the panels which ARE the toolbars are logically arranged and fairly easy to find. After all, if you’re using toolbars and you want to use the “Data Extraction” button it isn’t very logical or intuitive to find. You have to know that the button is in the “Modify 2” toolbar whereas in the “Insert” tab/ribbon, it is in the “Linking & Extraction” panel.

These ribbon is used is AutoCAD Architecture and in Revit, both of which have no option for a “classic” setup that has toolbars. So if you are planning on using any of these programs, you will be forced to use a ribbon. Since Microsoft Office switched to ribbons with Office 2007, and both Revit & AutoCAD Architecture use the ribbon, and AutoCAD’s default is now the ribbon, just try it for a week with an open mind. You will find it to be intuitive and provide more options.

~enjoy


Posted in BASICS, Customization, Settling In, TIPS | 1 Comment

Presenting Your Dimensional Constraints

If you have played around with dimensional constraints, you have noticed that they look very different than regular dimensions. In fact, they are so different that they are not presentable. Well… they will be presentable after reading this tutorial.

First, let’s make a dimensional constraint:

Scenario 1 – No existing dimensions

  • In the “Dimensional” panel on the “Parametric” ribbon, click the “Linear” dimensional constraint button.
  • A pickbox will appear, and if you hover over a line, a red x will appear at the end of the line that the “dim” will measure from. Click to accept and do the same for the other side of the line.
  • Place the dimension

Scenario 2 – Converting an existing dimension into a constraint

  • In the “Dimensional” panel on the “Parametric” ribbon, click the  “Convert” button.
  • Pick the dims that you want to convert. After selecting, hit <enter>.
  • The dims will now be converted.

These new dims are very functional, but not very presentable, so let’s fix that.

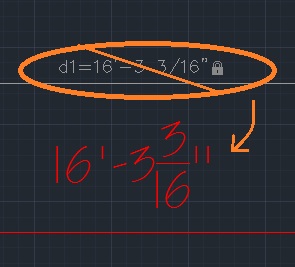
What we will do is change the constraint to not show the lock symbol, the “d1=” (name of the constraint), and put it back to the layer & color as it originally looked like when it was created.

Settings:

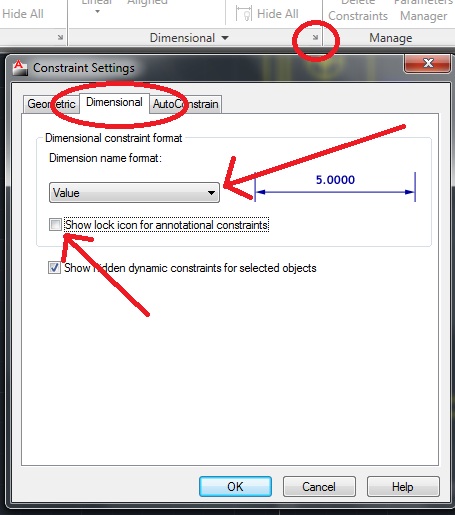
  • In the lower right corner of the “Dimensional” panel on the “Parametric” ribbon, click the diagonal arrow to open the “Constraint Settings” dialog.
  • Click the “Dimensional” tab
  • Change the dropdown from “Name and Expression” to “Value”
  • Uncheck the “Show lock icon for annotational constraints”
  • Click OK

Settings dialog


Notice that the name (prefix) of “d1=” has been removed but the lock symbol may still be visible and the color/layer is not correct yet.

  • Select the dim(s)
  • Right click and select Properties to open the Properties Tool Palette
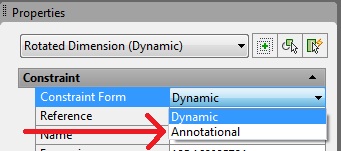
  • Change the “constraint form” from “Dynamic” to “Annotational”


  • Exit the Properties palette and your once un-presentable Dimensional Constraints are now presentable.
Posted in Customization, Dimensions, Modifying, TIPS | 5 Comments