AutoCAD has an isometric drawing mode that lets you drawing 3D-looking objects in 2D just like when you draw 3D objects on a flat sheet of paper. This means that even AutoCAD LT can draw 3D representations.
Q) What is an Isometric Drawing?
A) A pictorial representation of an object in which all three dimensions are drawn at full scale rather than foreshortening them to the true projection or vanishing point. An Isometric drawing therefore contains lines that remain paralell to each other. It is because these lines do not diminish into the horizon that they remain at full sclae and are therefore measurable.
Isometric planes:
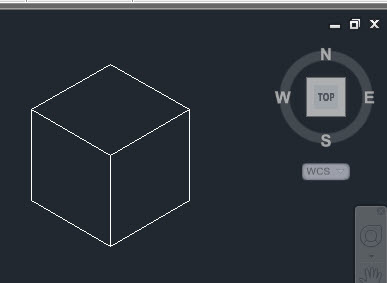
Notice below, that when drafting in an Isometric plane, you are still drawing in the flat 2D plane. You can see this by looking at your view as it is shown in the viewcube.
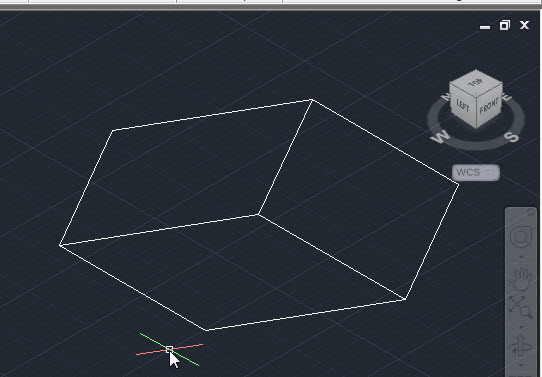
 The picture below shows the flat Iso-drawing when the view is rotated to a 3D view as shown by the rotation of the viewcube:
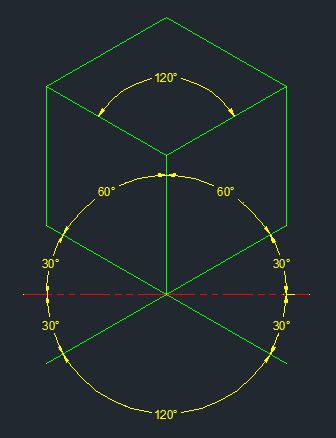
The Isometric planes are basically increments of 30 degrees and shown below:
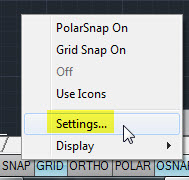
To turn on the Isometric mode, Right click on the “SNAP” button that is in the Drafting Settings buttons.
Select “Isometric Snap” from the dialog box and then click OK
Once the dialog box closes you will notice that your drawing cursor (cross hairs) will look funny. This is showing you that your cursor is in an Isometric mode.
To draft so that your lines are aligned with this Isometric mode make sure that ORTHO is turned on.
To change which Isometric mode you are in, use the F5 function button:
Shown below is an example of drawing a cube in Isometric mode:
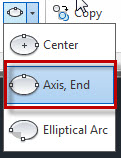
Isometrics are fun but they are a little difficult when it comes to rounded objects and rounded edges. When you need to create a circle, use an ellipse. And to be more specific, use the “Axis, End” ellipse tool. Using this tool while in an active isometric mode will show and extra sub-option in the command line. the sub-option that you need to select is the “Isocirlce” option. Drawing curved edges and objects while in Isometric mode will take some practice, so be patient and have fun.
~Greg





i would like to know about : is possible to change angles of isometric drafting or it is as it is by default ?
Isometrics are a very old form of “projection” from way, way back. There are several forms of so called projection, some of which have foreshortening due to drawing lines (that are at 90 to each other – ie: the edges of a table top) ) in what would be the x-y planes to vanishing points. Isometrics do away with this by making all lines that would be x-y plane lines run parallel at 30 degrees or 330 degrees.
If you need to draw, say, a nut and bolt, then you would have to go off those predetermined angles for the “45 degree lines”. Just turn off the ortho mode. If you have never done an isometric drawing in AutoCAD, know that 1) 45 degree lines are represented in isometric drawings as either straight horizontal or vertical lines, and 2) often it is easier to just draw an isometric square then trim off the angled parts.
If, however, I have misunderstood you, and what you are asking is “I like the look but don’t want the 30-330 angles, I want 20-340 angles… you could do that in AutoCAD, but just not with Isometric Snap. Like I said, Isometrics are a very old drawing system so if you go off the 30-330 then you are not truly drawing an Isometric. (Isometrics even have their own special ellipses used to represent circles – standard ellipses don’t look rightl). How you would tweek the snap aspect ratio to get what you are looking for is a whole other ball of wax. And representing circles would be a math nightmare….
After all that, in short though, Isometrics are a dying art. Once 3D becomes available in even basic drafting programs, and old board drafters like me all fade away, isometrics will fade away too. It is just so much easier to pull the rare “isometric view detail” by setting a camera angle than redrawing the whole design in isometric for clarity.And that camera angle can be exactly what you need.
I’m just getting into AutoCAD 2013, I have a Solidworks background, but this short write you have here has been very helpful to get me in the right direction for what I need to draw, Thank you
Sorry for he really late response – But you’re welcome and I am glad you found this helpful. Now I just need to update it.
~Greg
hi wouldmlike to know if we can do isometric to scale thnaking you in advance for your reply
I may not understand the question quite correctly – but one of the reasons for using isometric drawings is that it IS to scale. The other way of displaying 3D objects is to show them with “Perspective” and this is where two parallel edges of a 3D cube will appear to eventually merge at a point in the distance.
If you are asking how to draw to scale and fit a title block around the scaled drawing – this is where a viewport and using the layouts tabs would be beneficial.
hope that helps as a starting point.
~Greg
I guess I should (due to a compulsion for clarity for younger people). Isometrics were never really used for dimension-ally accurate information, just views to clarify design concepts. Maybe things have changed in some corners of the industry but you’d be hard pressed to get anyone to pull out an architect’s scale and pull dimensions off an iso.
That being said, If you normally draft plans and such and just need an iso detail, and you don’t want to muck with paperspace… keep your snap setting to standard, insert your border at the scale you need, then change your snap to iso snap and draw your detail.
If you always use paperspace then you got it.
hi,
Would you know how to insert an image into AutoCAD and for it to be rotated and appear correctly on an isometric drawing. I would be very grateful for the help, thanks.
i has a line in 2d which is in30degrees and now in isometrics howcan i draft it
good istruction
Hi, good intro. I’d like to know how to do an ellipse in isometric view. I looked for tutorials but only found how to draw circles using ellipses, but as I said, that’s not what I’m looking for. Thanks in advance for your help
I think that this is a limitation of drawing in a purely isometric mode. I will look into it further but I am thinking that it would be easier to draw it in 3D and then make the appropriate views which contain the isometric views. But I also understand that not everyone has a full version of AutoCAD and can’t work in 3D. That is why I will look in to it.
This goes to show the importance of knowing some of the “old” methods of manually drafting and how they would approach this situation
~Greg
I wish I could post an image because I would not have to explain things it would be instantly clear. Isometrics look hokey with standard text (at least to us old school guys). They look way better with iso text and dimensioning that is parallel to the lines.
If you set your text rotation angle to 330 and the oblique angle to 30 the text will run parallel to lines to the left and look like they are laying flat. Changing the oblique angle to 330 will make it look like it is standing up. If you set the rotation angle to 30 and the oblique to 30 the text will be parallel to the lines running right, and be laying down, changing the oblique to 330 will make it look standing up.
It seems like the older standards are dying off just because they are considered old or too much work. Isometric text is just a couple key strokes away and improve the professional look of your drawings.
A good example of where this pays off is piping. The line spec can be put in-line and look right just like it is on the plans.
Best instruction
I am designing a birthday cake .Wanting to put tools eg,hammer, screw driver also auto parts eg gaskets, steering wheel,nuts bolts and much more on a sheet of icing and am wanting it to look 3D.Pls could you tell me how I could do this.Warning! I am not very clever on computers or I may have worked it out for myself.Please could you guide me Greg I don’t know where to go from here and only have 1 weeks to have a print of this to start cake.
Kind regards Tina M
This is cool. Do you want a simple 2D drawing or a 3D model?
A 2D drawing can have a print out that the cake company use to go by where as 3D model will take too long and I dont know what a baker would be able to do with it since they wont have AutoCAD to reference. Of coarse you could print it out as a 3D PDF…
~Greg
Hi whats the diffrence between 3d modelling and isometric projection .
Many thanks ben
why my dimensions mirrored isometric mode when i print my dwg?
Hi Sir. I want to do oval shape like rectangle with oval shape. can you please advice me?
Regards
Tijo Varghese
Hello every body I share you a useful video to start
hi Autocad Tips….
I changed my settings into isometric.but problem is still remain.am using autocad 2012 Mechanical.
Hello I would like to know if i can view my 3D drawing in iso view(30 degrees angle)…because when ever i click on the view cube it only gives me an iso view of 45 degrees…